> ## Documentation Index
> Fetch the complete documentation index at: https://developers.criteo.com/llms.txt
> Use this file to discover all available pages before exploring further.
# Access Flows
> Authentication and authorization flows for connecting an AI platform to the Criteo MCP server.
Visit the [Get Started with MCP](/mcp/docs/criteos-model-context-protocol-mcp) page for more context.\
Please reach out to Criteo to get access before proceeding.
## Which Method Should You Choose?
Criteo MCP supports different authentication methods depending on your needs:
* The preferred integration method is by using **Pre-registered Client MCP Authorization flow with a Criteo API User Access Token Application** (e.g. in Claude, ChatGPT).
* By using this method you gain access to all the accounts available to the connected Criteo user.
* Alternatively, it is possible to connect to MCP without an authorization flow by using a **URL API key with a Criteo Client Credentials Application**.
* API key embeds credentials. Please reach out to your Criteo representative to request an API key. This method is designed for cases in which you want your integration scoped to a subset of your accounts.
* **Note:** The connection URL carries the embedded credentials in the form of an API key, rather than being tied to an individual user. Anyone holding the URL holds the access!
***
## Pre-registered Client MCP Authorization flow with a Criteo API User Access Token Application
The Criteo MCP Server implements **the standard MCP OAuth discovery flow for pre-registered clients**. This is the recommended method for AI platforms that support the OAuth specification.
Before you begin, you will need an **OAuth Authorization Code application with PKCE enabled**, **OAuth credentials**, and the required **Redirect URIs** configured manually. Please contact your Criteo representative in order to set up the application in Criteo's platform and provide you with the credentials before proceeding with the integration.
Dynamic Client Registration (DCR) is not currently supported.
Each client will ask you to register a different set of **Redirect URIs** in the application.
**How It Works**
1. Your AI platform connects to the Criteo MCP server
2. The server requires authentication
3. The client discovers the OAuth endpoints automatically
4. You authenticate with your Criteo credentials
5. The client uses the token for subsequent requests
***
### Using Claude
Register both: [https://claude.ai/api/mcp/auth\_callback](https://claude.ai/api/mcp/auth_callback) and [https://claude.com/api/mcp/auth\_callback](https://claude.com/api/mcp/auth_callback) as Redirect URIs on your OAuth Authorization Code app.
Talk to your Criteo representative to perform this!
Your Criteo representative will also provide you with your **OAuth Client ID and OAuth Client Secret**.
Find more information on this page (Claude's documentation): [Build custom connectors via remote MCP servers](https://support.claude.com/en/articles/11503834-build-custom-connectors-via-remote-mcp-servers)
Works on claude.ai, Claude Desktop, Cowork, mobile.
**Tool updates:** If Criteo changes the tools in a flavor, the connector picks them up on reconnect.
#### Integration Steps with Free, Pro and Max Plans
Free plan is limited to only one custom connector.
You can connect independently, without the administrator involved.
Go to [https://claude.ai/settings/connectors](https://claude.ai/settings/connectors), or **Settings > Connectors** on Desktop.
Click **+**, then **Add custom connector**.
Enter a name and paste the Criteo MCP flavor URL.
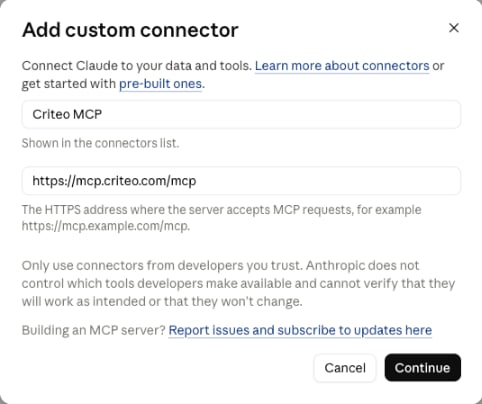 Select **Sign in now** and the option to **Use your own OAuth client**, entering the **OAuth Client ID** and **OAuth Client Secret** provided to you by your Criteo representative.
Leave **Advanced settings** untouched.
Click **Add**, then click **Connect**. You'll be redirected to the Criteo Consent Portal to complete the Criteo sign-in and consent screens.
Once connected, enable the connector per conversation using the **+** button at the bottom left of the chat, then **Connectors**.
#### Integration Steps with Team and Enterprise Plans
An Owner has to go first; each member then connects individually.
Go to **Organization settings > Connectors**, click **Add**, hover **Custom** and select **Web**, then add the flavor URL and click **Add**.
Every member then goes to **Settings > Connectors**, finds the connector in the list and clicks **Connect** to authenticate individually.
Once connected, enable the connector per conversation using the **+** button at the bottom left of the chat, then **Connectors**.
***
### Using ChatGPT
ChatGPT generates a **Callback URL** that is unique to each connector. You copy it from the connector's Advanced OAuth settings (step 3 below) and register it as the Redirect URI on your OAuth Authorization Code app.
Talk to your Criteo representative to perform this!
Your Criteo representative will also provide you with your **OAuth Client ID and OAuth Client Secret**.
Full MCP support, including **write actions**, is currently in beta and limited to **Business**, **Enterprise** and **Edu** plans. **Pro** users can connect MCP servers with **read and fetch only**, through developer mode.
* Only an **admin or owner** of the workspace can add a custom MCP server, and only once **developer mode** has been enabled. Developer mode is off by default. Enterprise and Edu users can delegate it to named developers through RBAC.
* Custom MCP servers are supported on the **web client only** — they are not available on mobile.
**Tool updates:** ChatGPT freezes a snapshot of the tool list when a connector is published. If Criteo changes the tools in a flavor, your workspace admin has to refresh and republish the connector, or calls may start to fail.
#### Integration Steps
Make sure **developer mode** is enabled in your ChatGPT settings, under **Security and login**. If the toggle is not available to you, request it from your workspace admin.
Select **Sign in now** and the option to **Use your own OAuth client**, entering the **OAuth Client ID** and **OAuth Client Secret** provided to you by your Criteo representative.
Leave **Advanced settings** untouched.
Click **Add**, then click **Connect**. You'll be redirected to the Criteo Consent Portal to complete the Criteo sign-in and consent screens.
Once connected, enable the connector per conversation using the **+** button at the bottom left of the chat, then **Connectors**.
#### Integration Steps with Team and Enterprise Plans
An Owner has to go first; each member then connects individually.
Go to **Organization settings > Connectors**, click **Add**, hover **Custom** and select **Web**, then add the flavor URL and click **Add**.
Every member then goes to **Settings > Connectors**, finds the connector in the list and clicks **Connect** to authenticate individually.
Once connected, enable the connector per conversation using the **+** button at the bottom left of the chat, then **Connectors**.
***
### Using ChatGPT
ChatGPT generates a **Callback URL** that is unique to each connector. You copy it from the connector's Advanced OAuth settings (step 3 below) and register it as the Redirect URI on your OAuth Authorization Code app.
Talk to your Criteo representative to perform this!
Your Criteo representative will also provide you with your **OAuth Client ID and OAuth Client Secret**.
Full MCP support, including **write actions**, is currently in beta and limited to **Business**, **Enterprise** and **Edu** plans. **Pro** users can connect MCP servers with **read and fetch only**, through developer mode.
* Only an **admin or owner** of the workspace can add a custom MCP server, and only once **developer mode** has been enabled. Developer mode is off by default. Enterprise and Edu users can delegate it to named developers through RBAC.
* Custom MCP servers are supported on the **web client only** — they are not available on mobile.
**Tool updates:** ChatGPT freezes a snapshot of the tool list when a connector is published. If Criteo changes the tools in a flavor, your workspace admin has to refresh and republish the connector, or calls may start to fail.
#### Integration Steps
Make sure **developer mode** is enabled in your ChatGPT settings, under **Security and login**. If the toggle is not available to you, request it from your workspace admin.
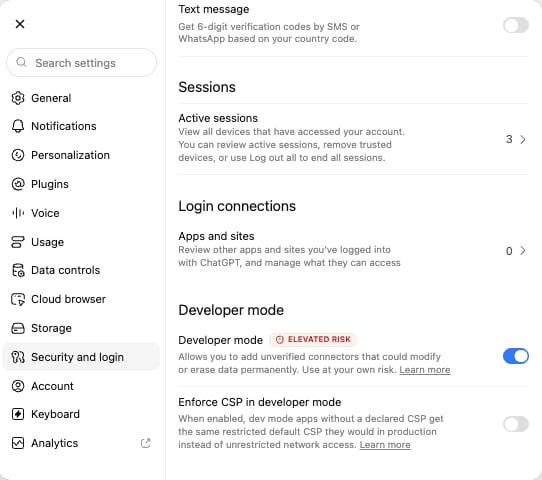 Go to the **Plugins** section and create a new plugin for the custom MCP server.
Enter the Criteo MCP flavor URL under **Connection**, set **Authentication** to **OAuth**, then open **Advanced OAuth settings** and copy the **Callback URL**.
This is the value you declare as the **Redirect URI** on your application in Criteo's platform. You pass this value to your Criteo representative!
Go to the **Plugins** section and create a new plugin for the custom MCP server.
Enter the Criteo MCP flavor URL under **Connection**, set **Authentication** to **OAuth**, then open **Advanced OAuth settings** and copy the **Callback URL**.
This is the value you declare as the **Redirect URI** on your application in Criteo's platform. You pass this value to your Criteo representative!
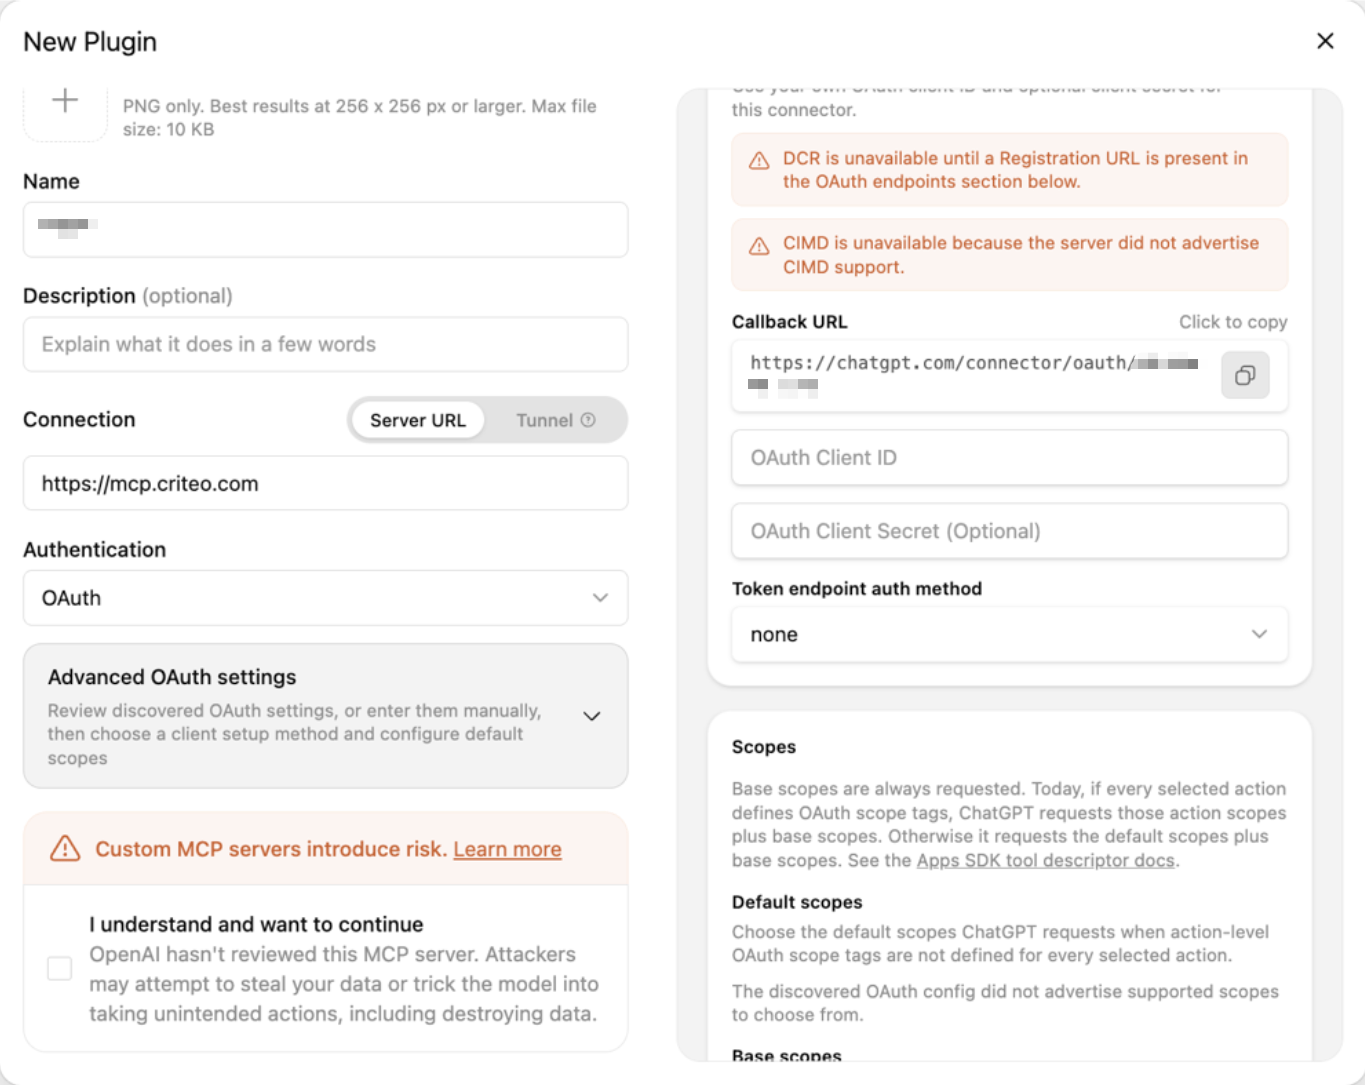 Fill in the **OAuth Client ID** and **OAuth Client Secret** provided to you by your Criteo representative.
Save the connector. A popup will appear and redirect you to the Criteo Consent Portal to complete the Criteo sign-in and consent screens.
***
### Using Other AI Platforms
The process should be similar:
* Talk to your Criteo representative in order to create an **OAuth Authorization Code application with PKCE enabled** inside the Criteo platform and receive your **OAuth credentials**.
* Provide the **Redirect URIs** to your Criteo representative in order to configure them inside the app.
* Add a new connector.
* Authenticate via OAuth using the provided **OAuth Client ID** and **OAuth Client Secret**.
* Complete the Criteo consent screens and log in to the Criteo platform.
***
## URL API key with a Criteo Client Credentials Application
Please reach out to your Criteo representative to request an **API key** and for them to create your MCP application on Criteo's platform. The API key contains the embedded credentials.
In order to integrate using this method, you need to have administrator permissions for the relevant Criteo account. Your account needs to be approved for the MCP application.
Your Criteo representative will send you a link to the Criteo Consent Portal through which you need to complete the consent screens. The consent link can be opened only once and expires afterwards. If someone other than the intended administrator opens it, a new consent link must be generated.
When adding the connector, there is no sign-in step because the authentication credentials are contained within the API key.
Keep your API key a secret! Anyone holding it holds access and there is no per-user revocation!
### How to Use
#### Option 1: As Part of the URL
* Include the `api-key` query parameter in your connection URL
* Example: [https://mcp.criteo.com/mcp?api-key=your-api-key](https://mcp.criteo.com/mcp?api-key=your-api-key)
#### Option 2: As an API Key Header
* Use the URL [https://mcp.criteo.com/mcp](https://mcp.criteo.com/mcp)
* Set the API Key on the header `x-api-key` in the client settings
* Example: `x-api-key: your-api-key`
Fill in the **OAuth Client ID** and **OAuth Client Secret** provided to you by your Criteo representative.
Save the connector. A popup will appear and redirect you to the Criteo Consent Portal to complete the Criteo sign-in and consent screens.
***
### Using Other AI Platforms
The process should be similar:
* Talk to your Criteo representative in order to create an **OAuth Authorization Code application with PKCE enabled** inside the Criteo platform and receive your **OAuth credentials**.
* Provide the **Redirect URIs** to your Criteo representative in order to configure them inside the app.
* Add a new connector.
* Authenticate via OAuth using the provided **OAuth Client ID** and **OAuth Client Secret**.
* Complete the Criteo consent screens and log in to the Criteo platform.
***
## URL API key with a Criteo Client Credentials Application
Please reach out to your Criteo representative to request an **API key** and for them to create your MCP application on Criteo's platform. The API key contains the embedded credentials.
In order to integrate using this method, you need to have administrator permissions for the relevant Criteo account. Your account needs to be approved for the MCP application.
Your Criteo representative will send you a link to the Criteo Consent Portal through which you need to complete the consent screens. The consent link can be opened only once and expires afterwards. If someone other than the intended administrator opens it, a new consent link must be generated.
When adding the connector, there is no sign-in step because the authentication credentials are contained within the API key.
Keep your API key a secret! Anyone holding it holds access and there is no per-user revocation!
### How to Use
#### Option 1: As Part of the URL
* Include the `api-key` query parameter in your connection URL
* Example: [https://mcp.criteo.com/mcp?api-key=your-api-key](https://mcp.criteo.com/mcp?api-key=your-api-key)
#### Option 2: As an API Key Header
* Use the URL [https://mcp.criteo.com/mcp](https://mcp.criteo.com/mcp)
* Set the API Key on the header `x-api-key` in the client settings
* Example: `x-api-key: your-api-key`