> ## Documentation Index
> Fetch the complete documentation index at: https://developers.criteo.com/llms.txt
> Use this file to discover all available pages before exploring further.
# Criteo Integration With Branch
> Configure your Criteo App campaign with Branch.
# Overview
This page will guide you in setting up your Criteo App campaign with Branch.
# App Events & Data
Please follow the instructions on [Branch's support pages](https://docs.branch.io/deep-linked-ads/criteo-mobile-tracking/#integrating-the-sdks-and-tracking-in-app-events) for integrating the SDKs and tracking in-app events.
# Dashboard Configuration
Once your app has the Branch SDK and the relevant events implemented and available in the Branch dashboard, we can proceed with the Dashboard Configuration step. This step allows Branch's Criteo module to:
* Start forwarding the events as postbacks to Criteo
* Attribute traffic to your Criteo campaigns
* Be reviewed by your Criteo technical contact
Keep in mind that the following settings are Criteo's recommendations but the ultimate goal is to match the options you want to take into account for your setup!
## \[Recommended] Enable Predictive Aggregate Measurement (PAM)
Branch uses PAM to expand attribution coverage for iOS users.
For more info, check: [Predictive Aggregate Measurement](https://help.branch.io/v1/docs/predictive-aggregate-measurement)
1. Under **App Settings** > **Attribution** tab, toggle on **PAM**
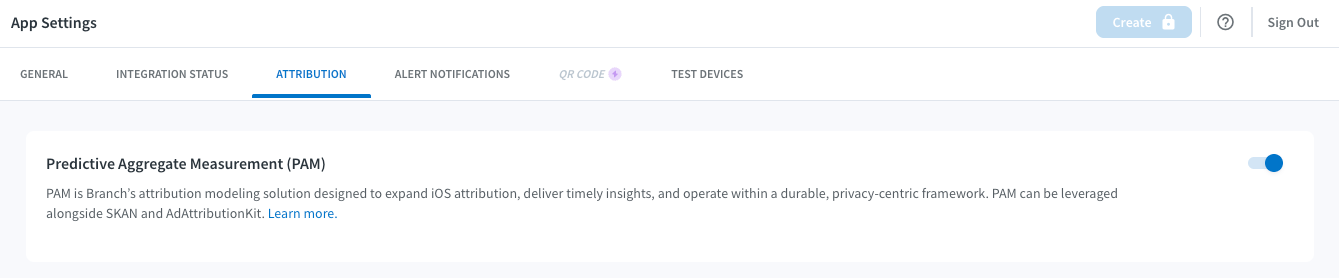 2. Click **Save**
## Enabling Criteo Ad Partner
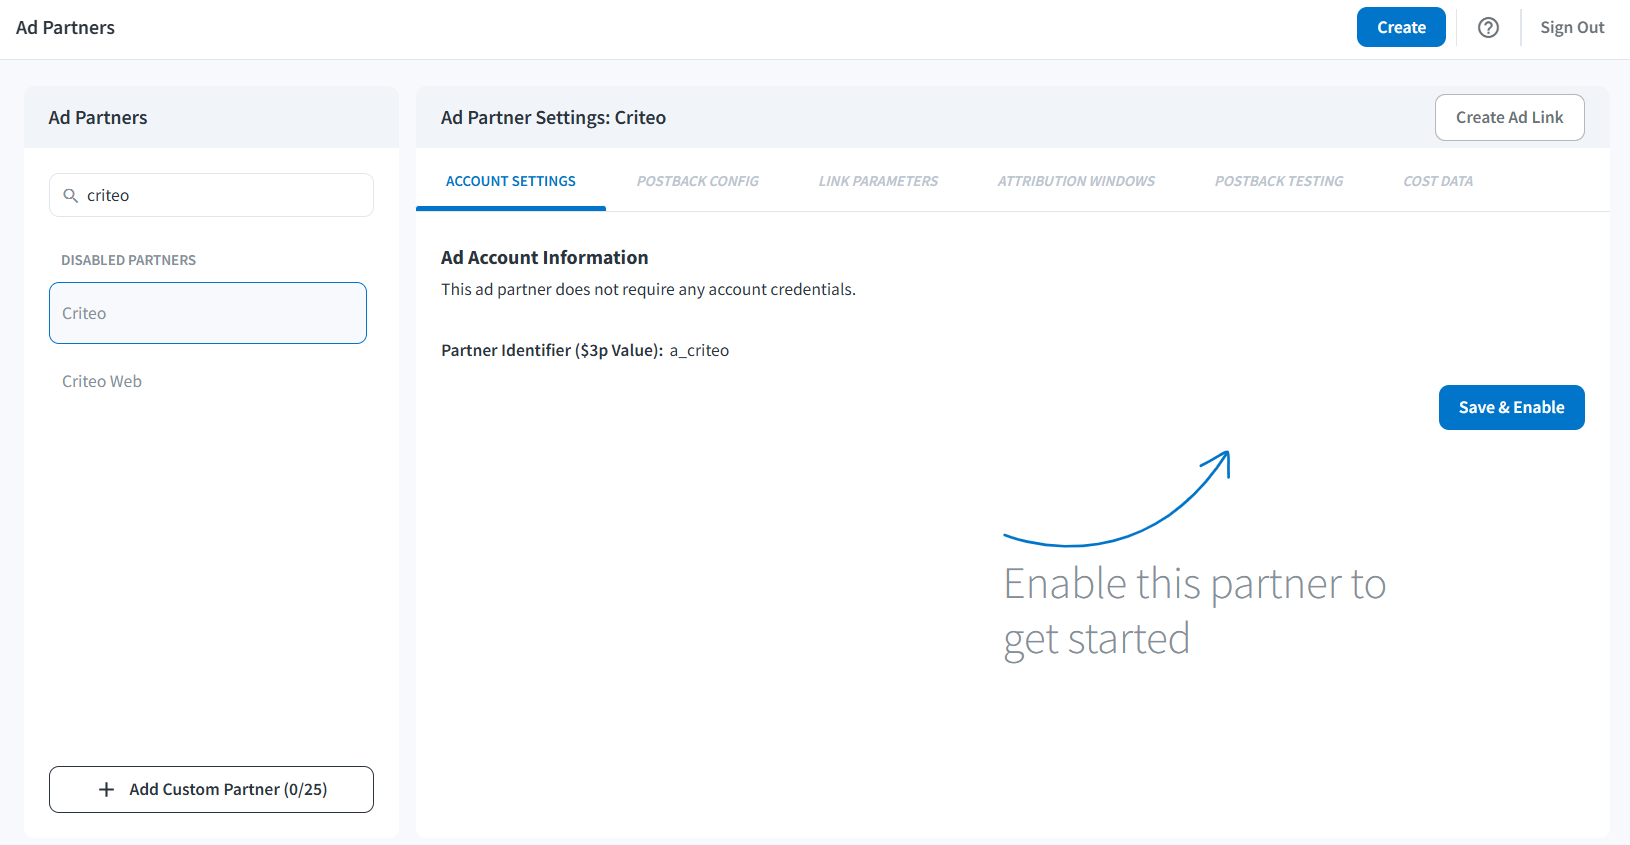
You can enable the Criteo ad partner in the Branch dashboard by following the steps below.
1. Under **Configure** section in the left side menu, select **Ad Partners**
2. Choose "**Criteo**" and click **Save & Enable**:
2. Click **Save**
## Enabling Criteo Ad Partner
You can enable the Criteo ad partner in the Branch dashboard by following the steps below.
1. Under **Configure** section in the left side menu, select **Ad Partners**
2. Choose "**Criteo**" and click **Save & Enable**:
 ## Configuring Event Postbacks
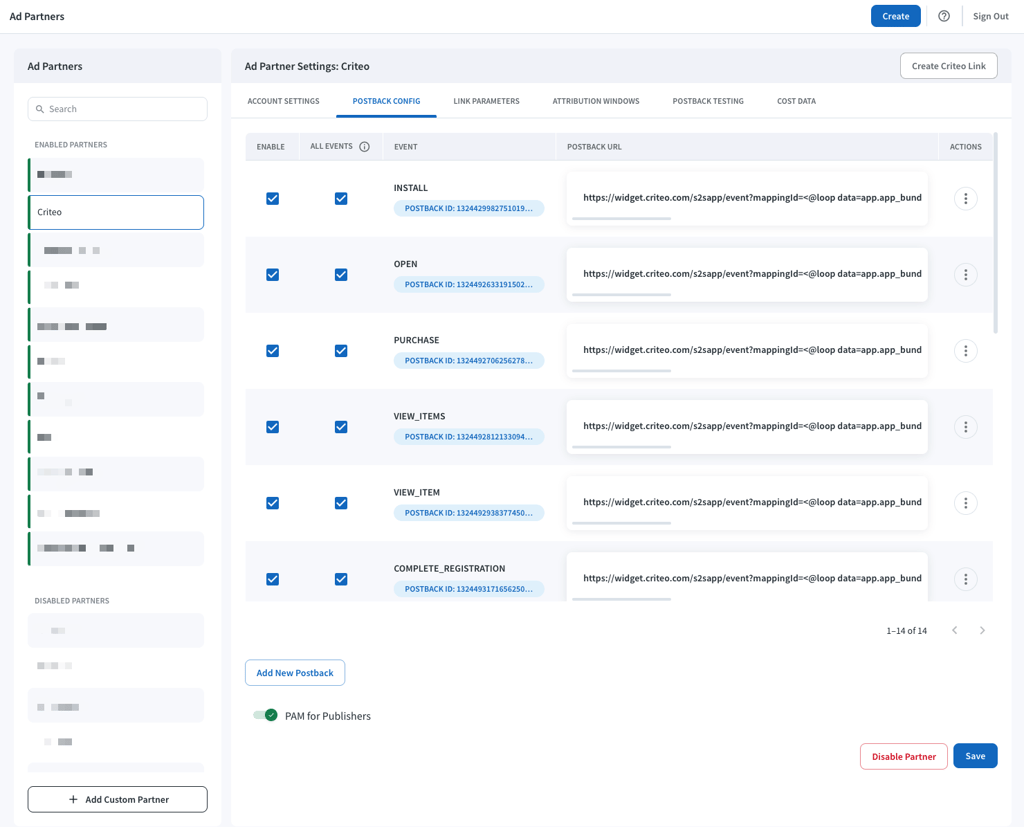
1. On tab **Postback Config**, enable all relevant event postbacks.
Please see the section [Recommended Events per Vertical](#recommended-events-per-vertical) below for the list of recommended events per vertical.
2. \[Recommended] Enable **PAM for Publishers** toggle to enable PAM for Criteo.
3. Make sure you have all checkboxes enabled on columns **Enable** and **All Events**, so that Criteo receives all of those events.
4. Click **Save**!
## Configuring Event Postbacks
1. On tab **Postback Config**, enable all relevant event postbacks.
Please see the section [Recommended Events per Vertical](#recommended-events-per-vertical) below for the list of recommended events per vertical.
2. \[Recommended] Enable **PAM for Publishers** toggle to enable PAM for Criteo.
3. Make sure you have all checkboxes enabled on columns **Enable** and **All Events**, so that Criteo receives all of those events.
4. Click **Save**!
 ## Attribution Windows Setup
Setting up **Impression** based attribution is optional and should be enabled only if taken into account.
In order to minimize discrepancies between Criteo and Branch dashboards, we recommend to use the following attribution windows:
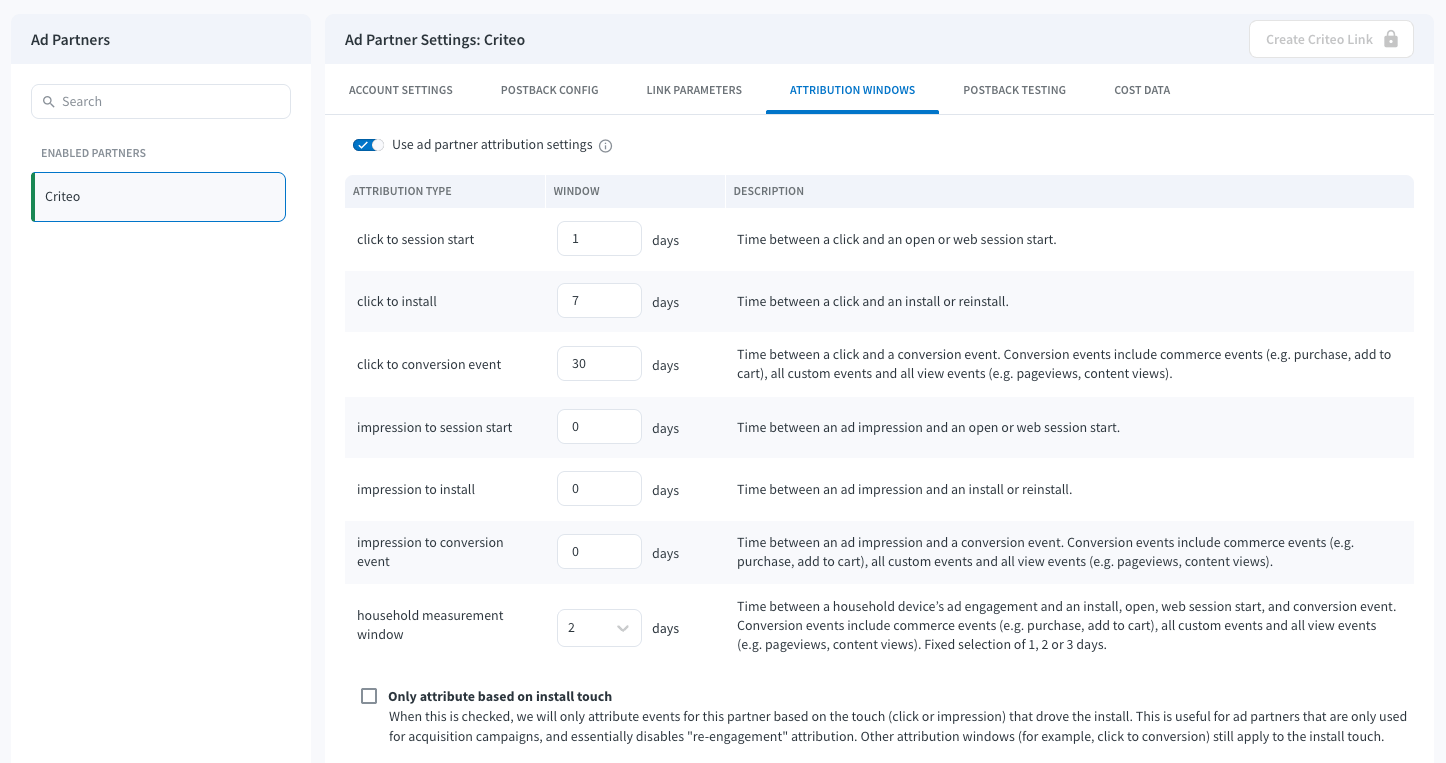
1. On tab **Attribution Windows**, enable **Use ad partner attribution settings**
2. For **Install campaigns**, the relevant attribution windows and their recommended values are:
* Click to Install: 7 days (default)
* Impression to Install: 0 day \[Increase this value if you take impression attribution into account]
3. For **Retargeting campaigns**, they are:
* Click to Conversion Event: 30 days (default)
* Impression to Conversion Event: 0 day \[Increase this value if you take impression attribution into account]
## Attribution Windows Setup
Setting up **Impression** based attribution is optional and should be enabled only if taken into account.
In order to minimize discrepancies between Criteo and Branch dashboards, we recommend to use the following attribution windows:
1. On tab **Attribution Windows**, enable **Use ad partner attribution settings**
2. For **Install campaigns**, the relevant attribution windows and their recommended values are:
* Click to Install: 7 days (default)
* Impression to Install: 0 day \[Increase this value if you take impression attribution into account]
3. For **Retargeting campaigns**, they are:
* Click to Conversion Event: 30 days (default)
* Impression to Conversion Event: 0 day \[Increase this value if you take impression attribution into account]
 4. Click **Save**!
The attribution windows above are **recommendations** to be aligned with our standard campaigns setup. If you still prefer to use different windows, please inform your Criteo contact about your attribution model.
For more info, access [Branch Attribution Logic & Settings](https://help.branch.io/using-branch/docs/branch-attribution-logic-settings)
## Branch Link Creation
Next, Criteo needs a Branch Link created specifically for our campaign(s), to be used in our banners and inform Branch about our traffic.
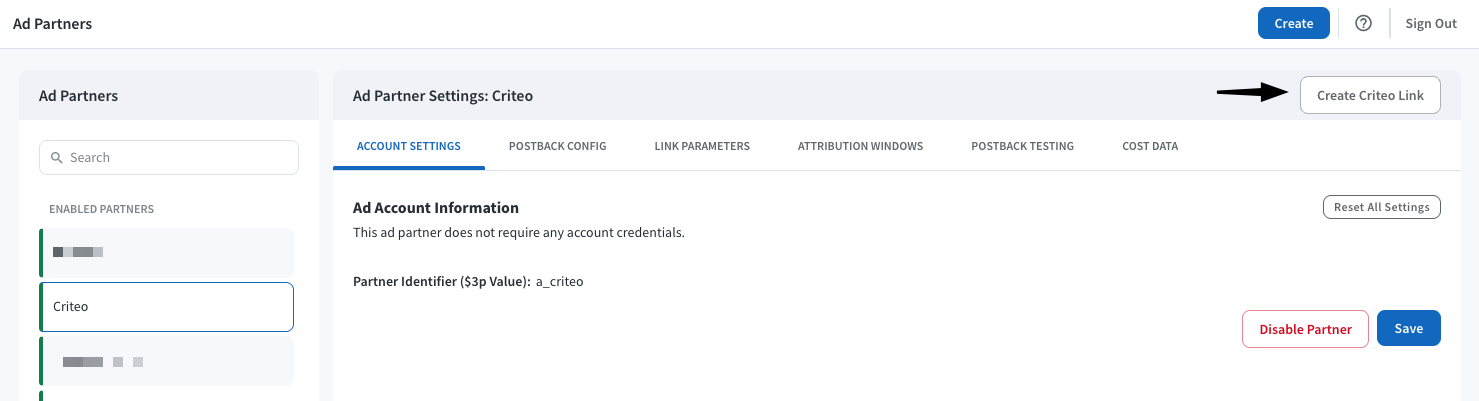
1. Still under **Ad Partners** > **Criteo**, click **Create Criteo Link** in the top right side:
4. Click **Save**!
The attribution windows above are **recommendations** to be aligned with our standard campaigns setup. If you still prefer to use different windows, please inform your Criteo contact about your attribution model.
For more info, access [Branch Attribution Logic & Settings](https://help.branch.io/using-branch/docs/branch-attribution-logic-settings)
## Branch Link Creation
Next, Criteo needs a Branch Link created specifically for our campaign(s), to be used in our banners and inform Branch about our traffic.
1. Still under **Ad Partners** > **Criteo**, click **Create Criteo Link** in the top right side:
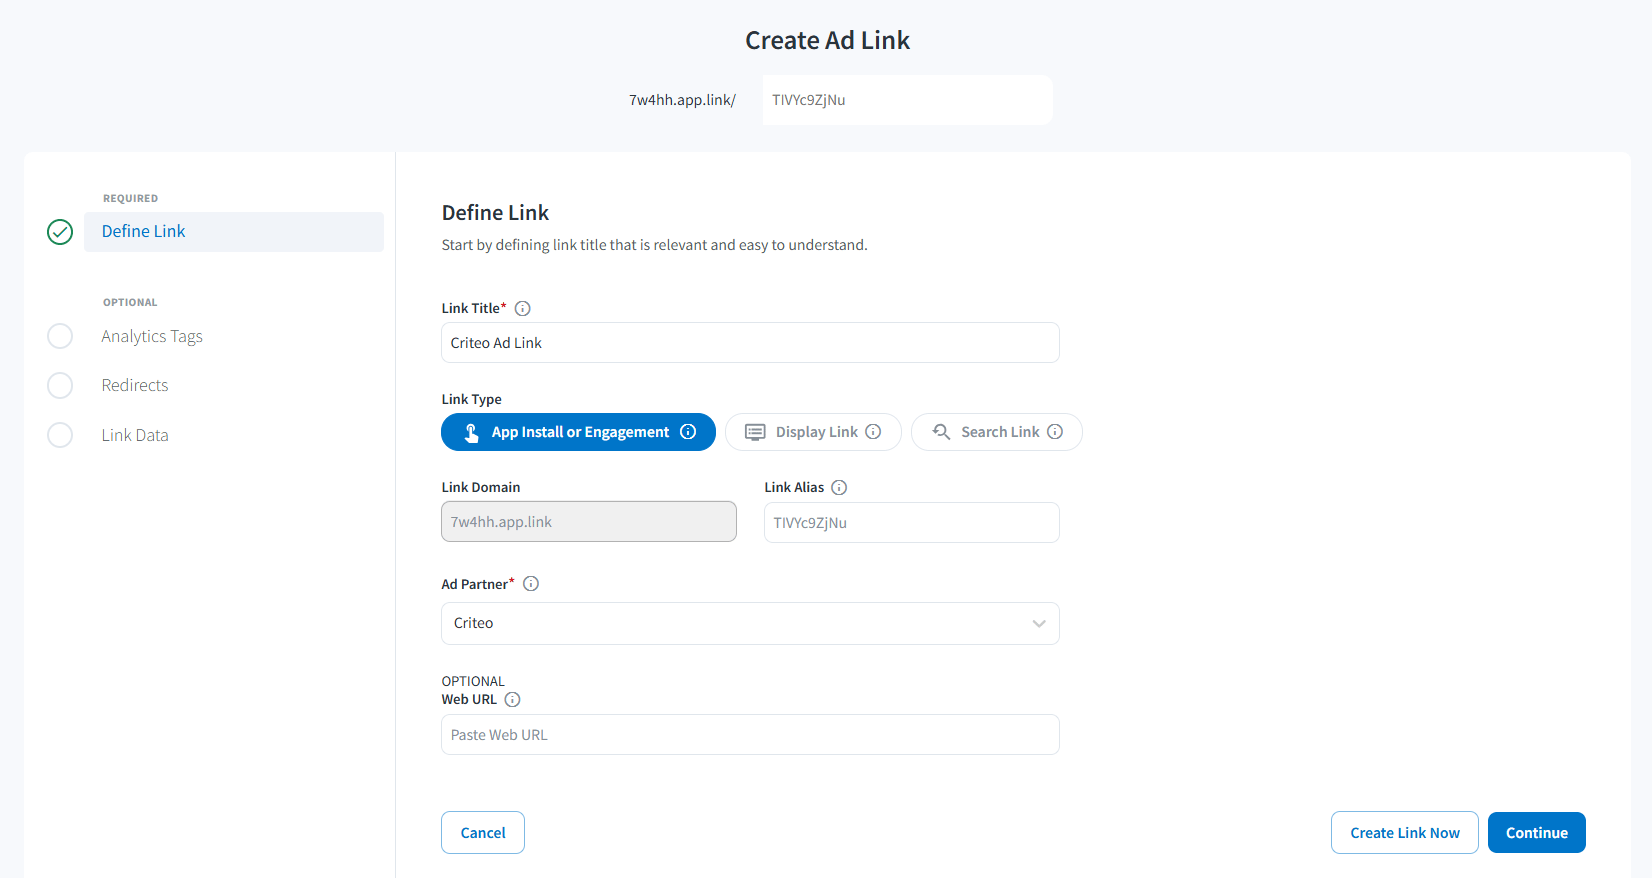
 2. Select **App Install or Engagement**
3. **Name your link** with something that will make it easy to identify if you need it later
* Your Ad Partner should be selected already, but feel free to choose one if it isn't. It's important that you select the right Ad Partner for analytics later on.
4. Click **Continue**:
2. Select **App Install or Engagement**
3. **Name your link** with something that will make it easy to identify if you need it later
* Your Ad Partner should be selected already, but feel free to choose one if it isn't. It's important that you select the right Ad Partner for analytics later on.
4. Click **Continue**:
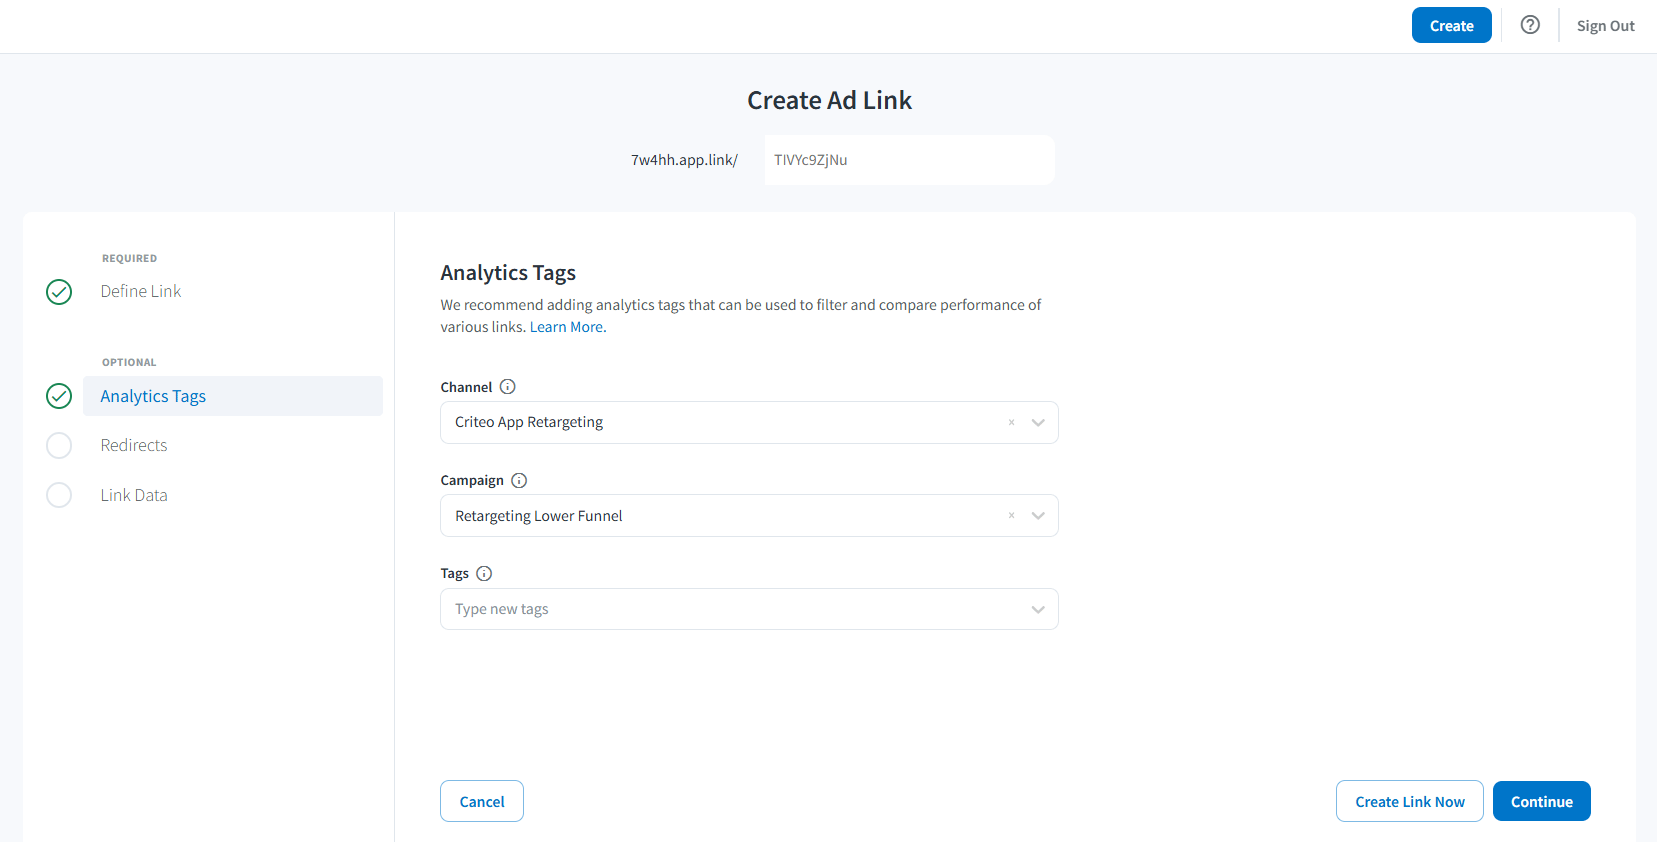
 5. Now, you can customize your Branch Link in different aspects:
* **Analytics Tags**: parameters for reporting purposes, allows you to customize the Channel, Campaign names or Tags
5. Now, you can customize your Branch Link in different aspects:
* **Analytics Tags**: parameters for reporting purposes, allows you to customize the Channel, Campaign names or Tags
 * **Redirects**: defines the default URLs in case the app is not installed
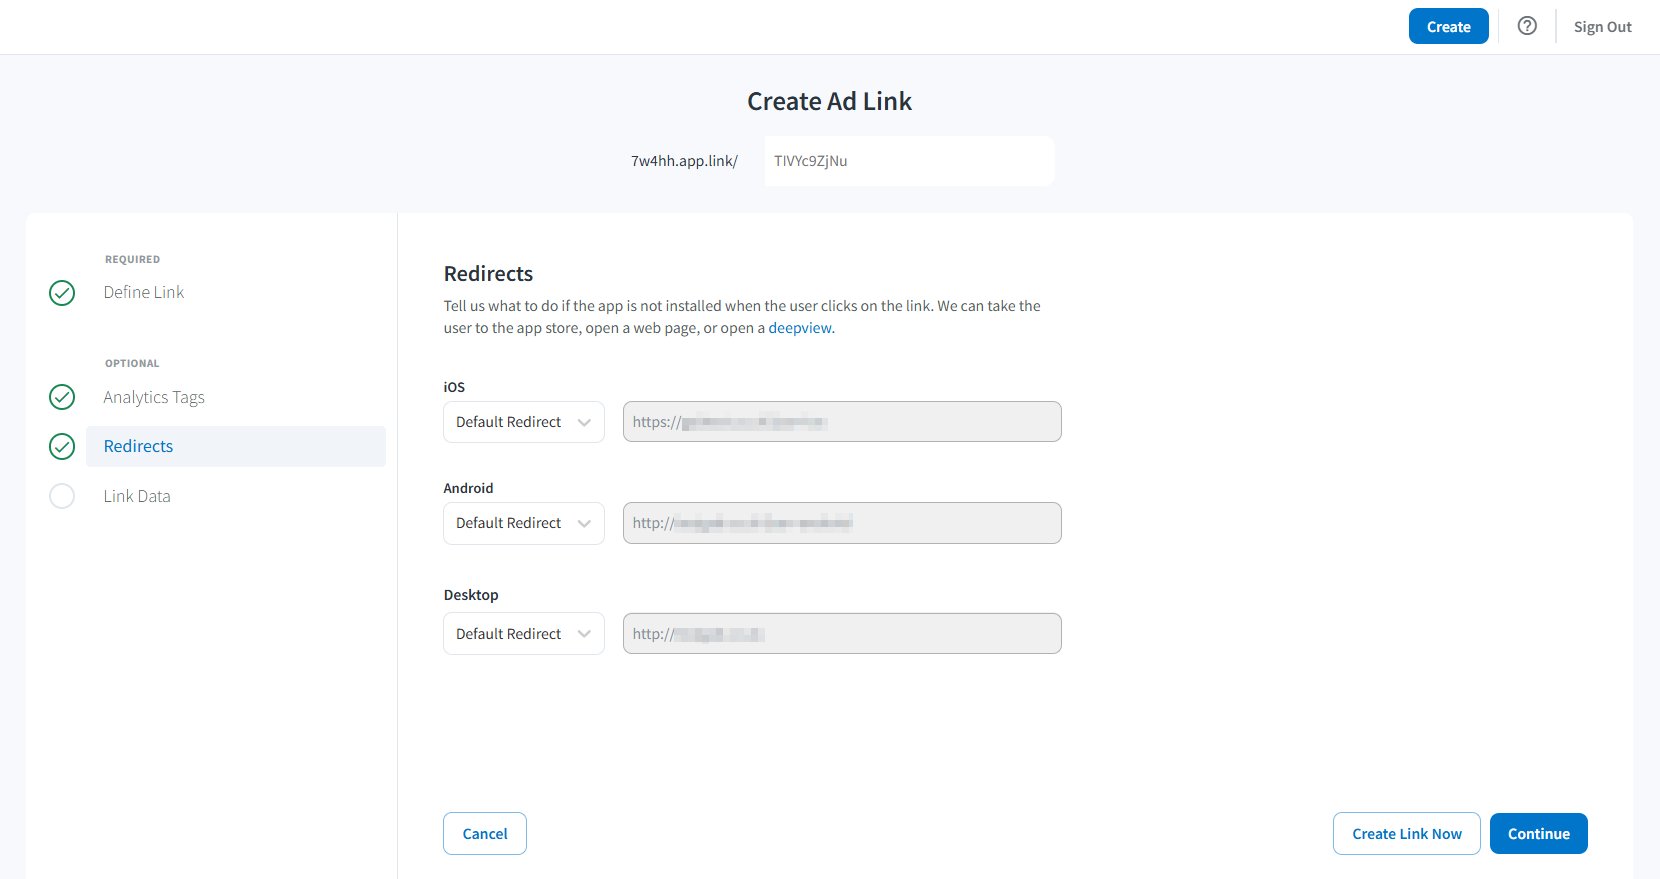 Feel free to keep the default options here in case you're not sure what to configure.
6. Click on **Create Link Now** to finish the tracking links creation:
Feel free to keep the default options here in case you're not sure what to configure.
6. Click on **Create Link Now** to finish the tracking links creation:
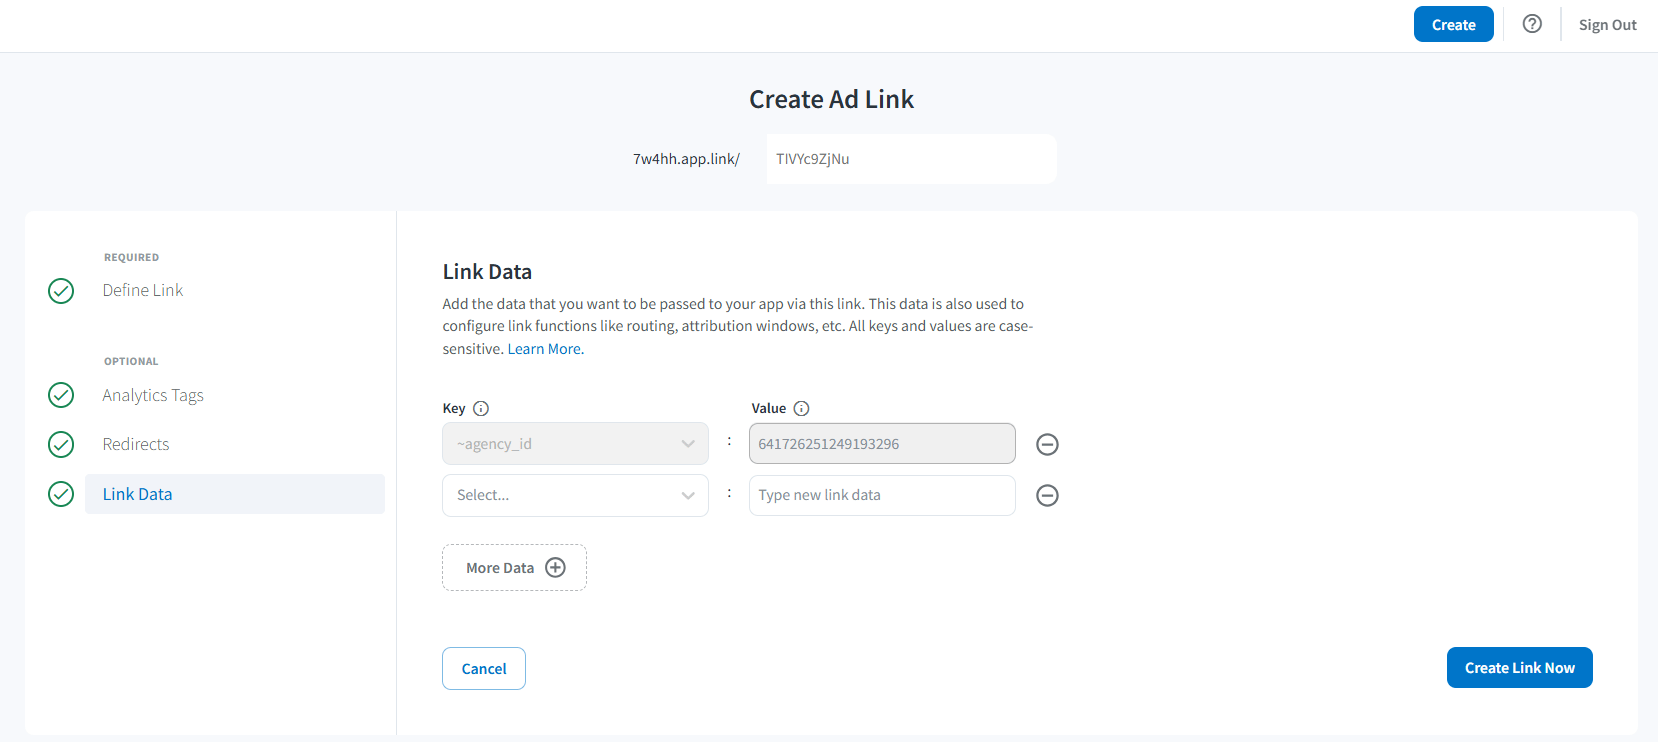 7. Copy both Click & Impression Tracking Links and send to your Criteo contact, to be configured on our side! Later on you can find them in the **Link Hub**.
## Dashboard Access
Granting your Criteo team access to your Branch dashboard allows us to not only better support you during the integration phase, but it also allows quicker troubleshooting into the future, if needed.
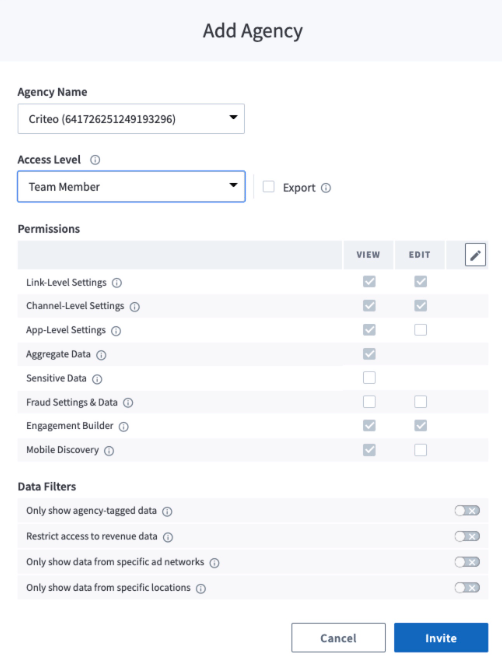
1. Under **Account** -> **Settings** in the left side menu
2. Select tab **Agencies** and **Add New Agency**
3. On **Agency Name**, select **Criteo (641726251249193296)** (our official agency account as Branch Ad Partner)
4. And, on **Access Level**, choose **Team Member**, which will allow us to:
* *Link-Level Settings*: view & edit settings for Branch links that need to be configured on Criteo banners
* *Channel-Level Settings*: view & edit settings for Criteo-only channel
* *App-Level Settings*: view-only access to App settings, for deeper technical troubleshooting
* *Aggregate Data*: view-only access to aggregated data, for discrepancies troubleshooting
5. Then, click on **Invite** and our team should accept it soon!
# Recommended Events per Vertical
The recommendation is to send all events that describe the "user-flow" in the app. Please refer to the detailed integration guide for iOS or Android to configure all events.
| Event Name | Description | Retail | Travel | Classified | Gaming | Streaming Entertainment | Finance | Dating Social | RideHailing |
| --------------------------------------------------- | ------------------------------------------------------------------ | ------ | ------ | ---------- | ------ | ----------------------- | ------- | ------------- | ----------- |
| app open/app launch | when user installs the app | Y | Y | Y | Y | Y | Y | Y | Y |
| home page / App open | when user opens the app or arrives on the home page | Y | Y | Y | Y | Y | Y | Y | Y |
| view item list / listing | when a user sees list of items/products/offering | Y | Y | Y | | Y | | | Y |
| view item | when a user sees one specific item/products/offering | Y | Y | Y | Y | Y | Y | | |
| add to cart | when a user adds an item/product to the cart | Y | Y | | | | | | |
| basket | when user is on the basket page | Y | Y | | | | | | |
| purchase | when user makes a purchase | Y | Y | Y | Y | | Y | | Y |
| add to wish list | when a user adds an item/product to the wish list | Y | Y | | | | | | |
| complete registration / create an account / sign up | when a user creates an account, signs up or completes registration | Y | Y | Y | Y | Y | Y | Y | Y |
| login | when a user logs in | Y | Y | Y | Y | Y | Y | Y | Y |
| add payment info | when a user adds payment info | Y | Y | | | | Y | | Y |
| begin checkout | when a user starts the purchase flow | Y | Y | | | | Y | | |
| purchase cancelled / purchase refund | when a user cancels a purchase or asks for a refund | Y | Y | | | | | | Y |
| generate lead | when a user generates a lead | | | Y | | | | | |
| start trial | when a user starts the trial version of the app | | | | Y | Y | Y | Y | |
| subscribe | when a user subscribes (recurring payment) | Y | | | | Y | Y | Y | |
| select item | when a user has selected content in an app | | | | Y | | | | Y |
| earn virtual currency | when a user earns virtual currency | | | | Y | | | | |
| level up | when a user passes a level | | | | Y | | | | |
| spend virtual currency/credit | when a user spends virtual currency | | | | Y | | | | |
| tutorial begin | when a user starts the tutorial | | | | Y | | | | |
| tutorial complete | when a user completes the tutorial | | | | Y | | | | |
| unlock achievement | when a user unlocks an achievement | | | | Y | | | | |
| search | | | Y | | | | | | |
| video/audio start or media play | when user starts to play media in the app | | | | | Y | | | |
# Catalog Feed for Dynamic Campaigns
A catalog feed is an XML or a CSV file containing product information (name, price, deep link, image link, etc.) that allows Criteo to dynamically generate the product recommendation banners. Therefore, it is important to keep this file up to date in order for Criteo to show the right data in your banners.
The following points need to be kept in mind:
* Each product must have a unique ID that must be identical to the one passed in the events.
* The catalog feed must contain all or at least most of your site's products.
* Recommended image resolution is 300x300 pixels to 400x400 pixels.
Criteo will already have the catalog feed in some instances (i.e. live campaigns on mobile, web, or desktop).
For more information, please request the dedicated guide from your contact.
7. Copy both Click & Impression Tracking Links and send to your Criteo contact, to be configured on our side! Later on you can find them in the **Link Hub**.
## Dashboard Access
Granting your Criteo team access to your Branch dashboard allows us to not only better support you during the integration phase, but it also allows quicker troubleshooting into the future, if needed.
1. Under **Account** -> **Settings** in the left side menu
2. Select tab **Agencies** and **Add New Agency**
3. On **Agency Name**, select **Criteo (641726251249193296)** (our official agency account as Branch Ad Partner)
4. And, on **Access Level**, choose **Team Member**, which will allow us to:
* *Link-Level Settings*: view & edit settings for Branch links that need to be configured on Criteo banners
* *Channel-Level Settings*: view & edit settings for Criteo-only channel
* *App-Level Settings*: view-only access to App settings, for deeper technical troubleshooting
* *Aggregate Data*: view-only access to aggregated data, for discrepancies troubleshooting
5. Then, click on **Invite** and our team should accept it soon!
# Recommended Events per Vertical
The recommendation is to send all events that describe the "user-flow" in the app. Please refer to the detailed integration guide for iOS or Android to configure all events.
| Event Name | Description | Retail | Travel | Classified | Gaming | Streaming Entertainment | Finance | Dating Social | RideHailing |
| --------------------------------------------------- | ------------------------------------------------------------------ | ------ | ------ | ---------- | ------ | ----------------------- | ------- | ------------- | ----------- |
| app open/app launch | when user installs the app | Y | Y | Y | Y | Y | Y | Y | Y |
| home page / App open | when user opens the app or arrives on the home page | Y | Y | Y | Y | Y | Y | Y | Y |
| view item list / listing | when a user sees list of items/products/offering | Y | Y | Y | | Y | | | Y |
| view item | when a user sees one specific item/products/offering | Y | Y | Y | Y | Y | Y | | |
| add to cart | when a user adds an item/product to the cart | Y | Y | | | | | | |
| basket | when user is on the basket page | Y | Y | | | | | | |
| purchase | when user makes a purchase | Y | Y | Y | Y | | Y | | Y |
| add to wish list | when a user adds an item/product to the wish list | Y | Y | | | | | | |
| complete registration / create an account / sign up | when a user creates an account, signs up or completes registration | Y | Y | Y | Y | Y | Y | Y | Y |
| login | when a user logs in | Y | Y | Y | Y | Y | Y | Y | Y |
| add payment info | when a user adds payment info | Y | Y | | | | Y | | Y |
| begin checkout | when a user starts the purchase flow | Y | Y | | | | Y | | |
| purchase cancelled / purchase refund | when a user cancels a purchase or asks for a refund | Y | Y | | | | | | Y |
| generate lead | when a user generates a lead | | | Y | | | | | |
| start trial | when a user starts the trial version of the app | | | | Y | Y | Y | Y | |
| subscribe | when a user subscribes (recurring payment) | Y | | | | Y | Y | Y | |
| select item | when a user has selected content in an app | | | | Y | | | | Y |
| earn virtual currency | when a user earns virtual currency | | | | Y | | | | |
| level up | when a user passes a level | | | | Y | | | | |
| spend virtual currency/credit | when a user spends virtual currency | | | | Y | | | | |
| tutorial begin | when a user starts the tutorial | | | | Y | | | | |
| tutorial complete | when a user completes the tutorial | | | | Y | | | | |
| unlock achievement | when a user unlocks an achievement | | | | Y | | | | |
| search | | | Y | | | | | | |
| video/audio start or media play | when user starts to play media in the app | | | | | Y | | | |
# Catalog Feed for Dynamic Campaigns
A catalog feed is an XML or a CSV file containing product information (name, price, deep link, image link, etc.) that allows Criteo to dynamically generate the product recommendation banners. Therefore, it is important to keep this file up to date in order for Criteo to show the right data in your banners.
The following points need to be kept in mind:
* Each product must have a unique ID that must be identical to the one passed in the events.
* The catalog feed must contain all or at least most of your site's products.
* Recommended image resolution is 300x300 pixels to 400x400 pixels.
Criteo will already have the catalog feed in some instances (i.e. live campaigns on mobile, web, or desktop).
For more information, please request the dedicated guide from your contact.