> ## Documentation Index
> Fetch the complete documentation index at: https://developers.criteo.com/llms.txt
> Use this file to discover all available pages before exploring further.
# OAuth App - Authorization Code Setup
This guide provides step-by-step instructions on setting up an API application using the authorization code workflow
# Setting up an authorization code application
## Step 1. Authorization Code Setup
### Creating an authorization code app
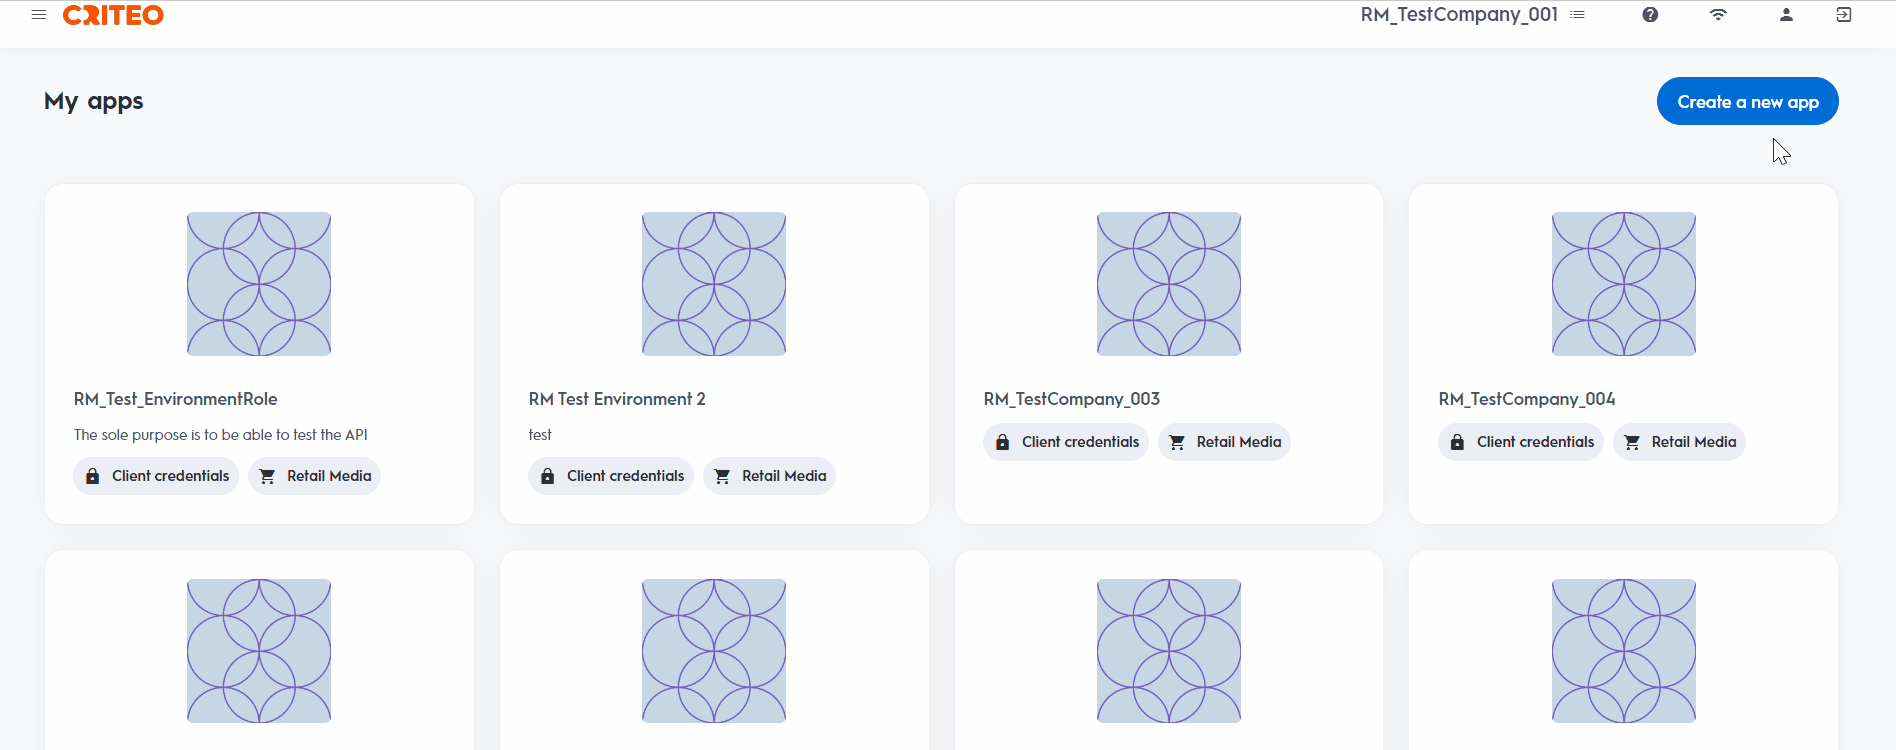
Log in to the Criteo Partners Portal and create a new app by clicking the ➕ button in the `My apps` section.
 This will open a modal where you can select type of application.
***
### Create app
#### App details
* Provide your app name and description. Optionally, add an image to identify your application.
* On your app page, you can define the scope of your application and OAuth parameters. For more details, please refer to [our onboarding checklist](/retail-media/v2026-preview/docs/onboarding-checklist#3-define-your-app-scope).
This will open a modal where you can select type of application.
***
### Create app
#### App details
* Provide your app name and description. Optionally, add an image to identify your application.
* On your app page, you can define the scope of your application and OAuth parameters. For more details, please refer to [our onboarding checklist](/retail-media/v2026-preview/docs/onboarding-checklist#3-define-your-app-scope).
 ***
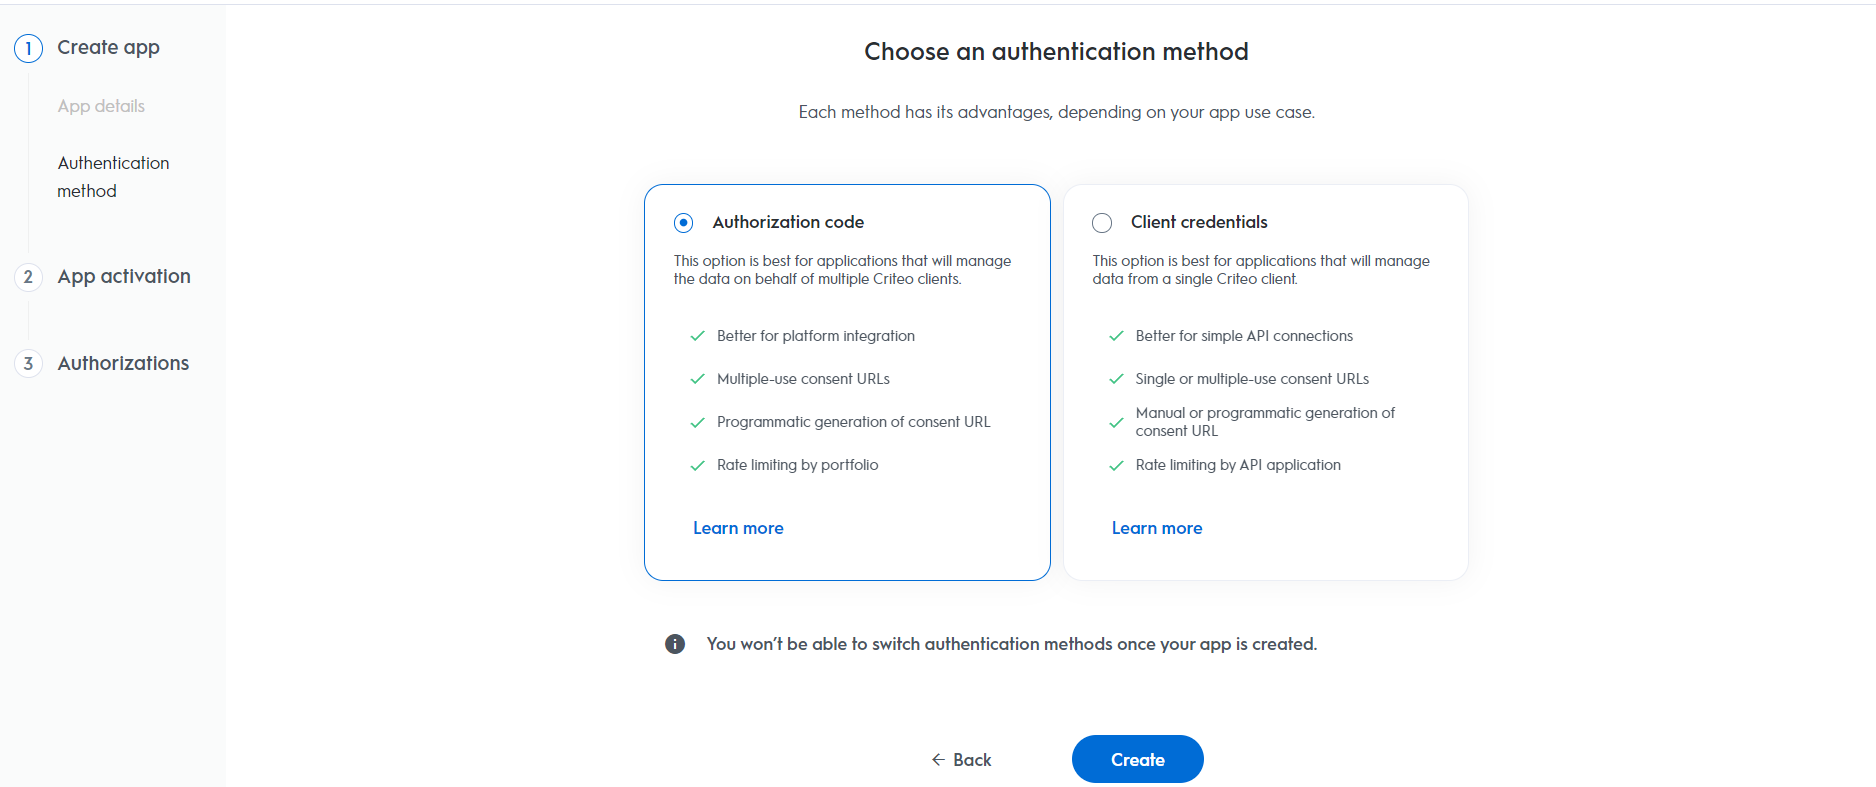
#### Authentication method
* Choose your app's authentication method. You can select between Client Credentials or Authorization Code. Use the guide above to determine which option best suits your organization.
***
#### Authentication method
* Choose your app's authentication method. You can select between Client Credentials or Authorization Code. Use the guide above to determine which option best suits your organization.
 ***
### App activation
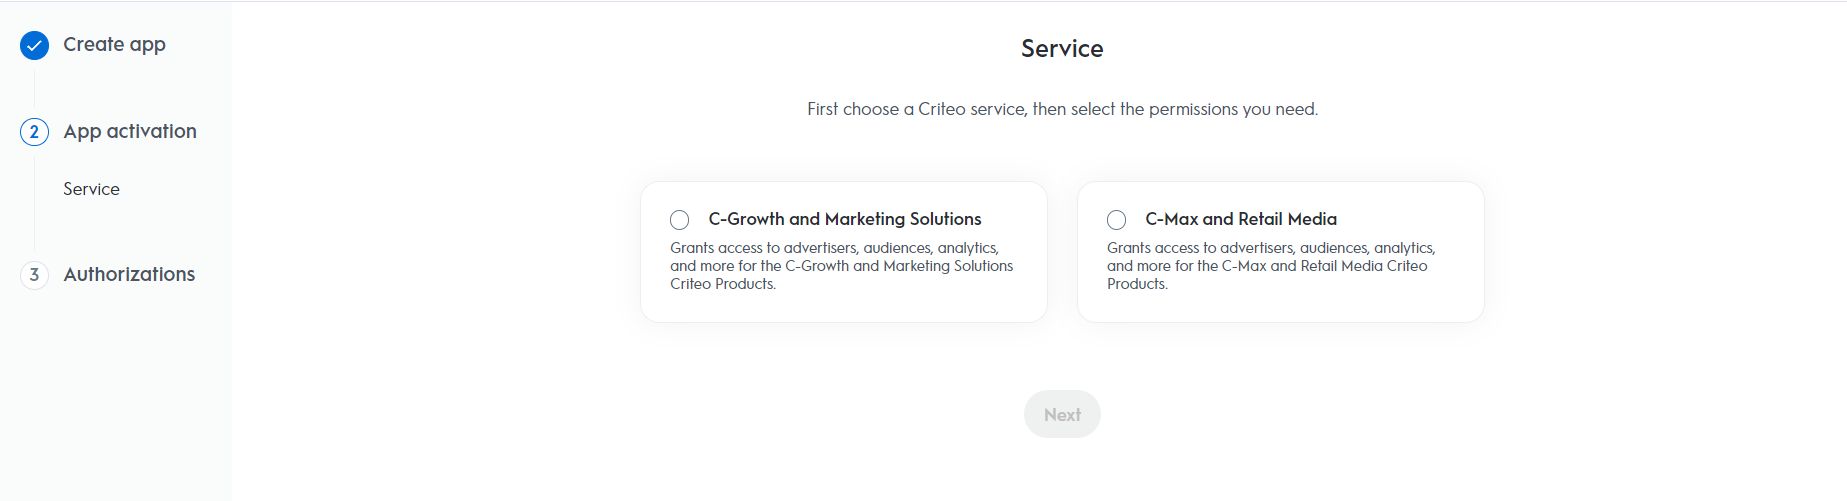
#### Service
* Choose the Criteo service for your API application. Select C-Growth for marketing solutions or C-Max for retail media.
***
### App activation
#### Service
* Choose the Criteo service for your API application. Select C-Growth for marketing solutions or C-Max for retail media.
 ***
### Authorizations
#### Domains
* Choose the domains that define the permission access your application needs.
***
### Authorizations
#### Domains
* Choose the domains that define the permission access your application needs.
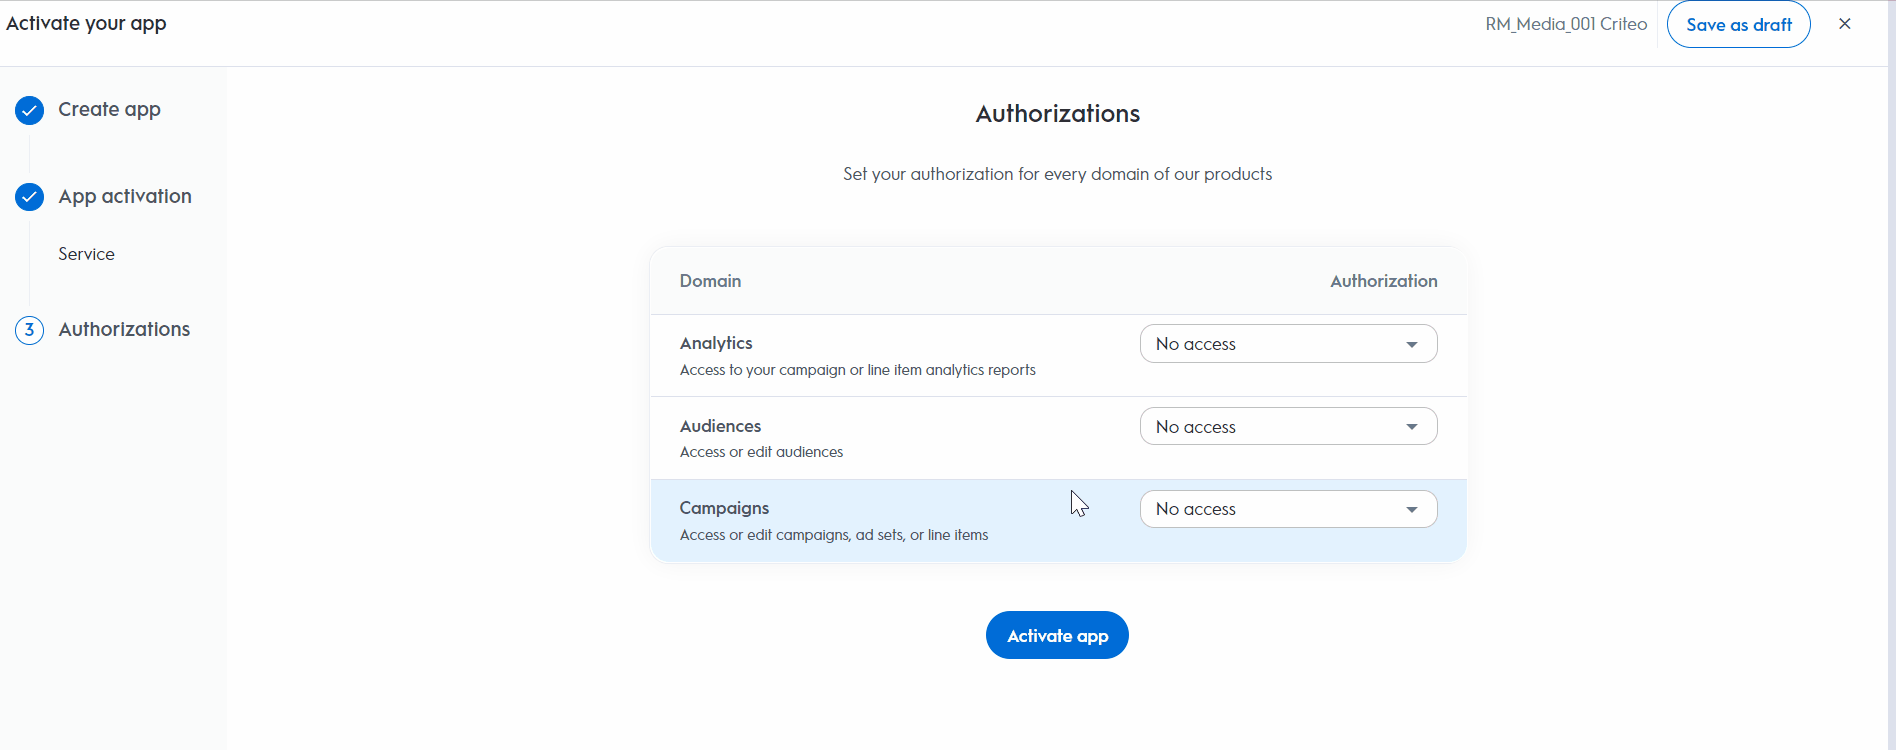 After completing these steps, click `Activate app` to activate the application.
#### Redirect URI
* For applications using the authorization code workflow, you need to specify a **Redirect URI** as part of your app scope.
After completing these steps, click `Activate app` to activate the application.
#### Redirect URI
* For applications using the authorization code workflow, you need to specify a **Redirect URI** as part of your app scope.
 ***
## Step 2. Set Up Your OAuth Parameters
After defining your application’s scope, set up the necessary parameters for the authorization code workflow.
| Parameters | Description |
| --------------- | ---------------------------------------------------------------------------------------------------------------------------------------------------------------- |
| `client_id` | Your public key, accessible in the app credentials section. You can manage up to 5 pairs of credentials, even after the app has been activated. |
| `client_secret` | Your secret key, accessible only once when creating a pair of `client_id` and `client_secret`. You can manage up to 5 pairs of credentials after app activation. |
| `redirect_uri` | The URL to redirect the user to after consent. Requires HTTPS. You can add up to 30 redirect URIs, manageable after app activation. |
You can now publish the app and initiate the authorization code workflow.
***
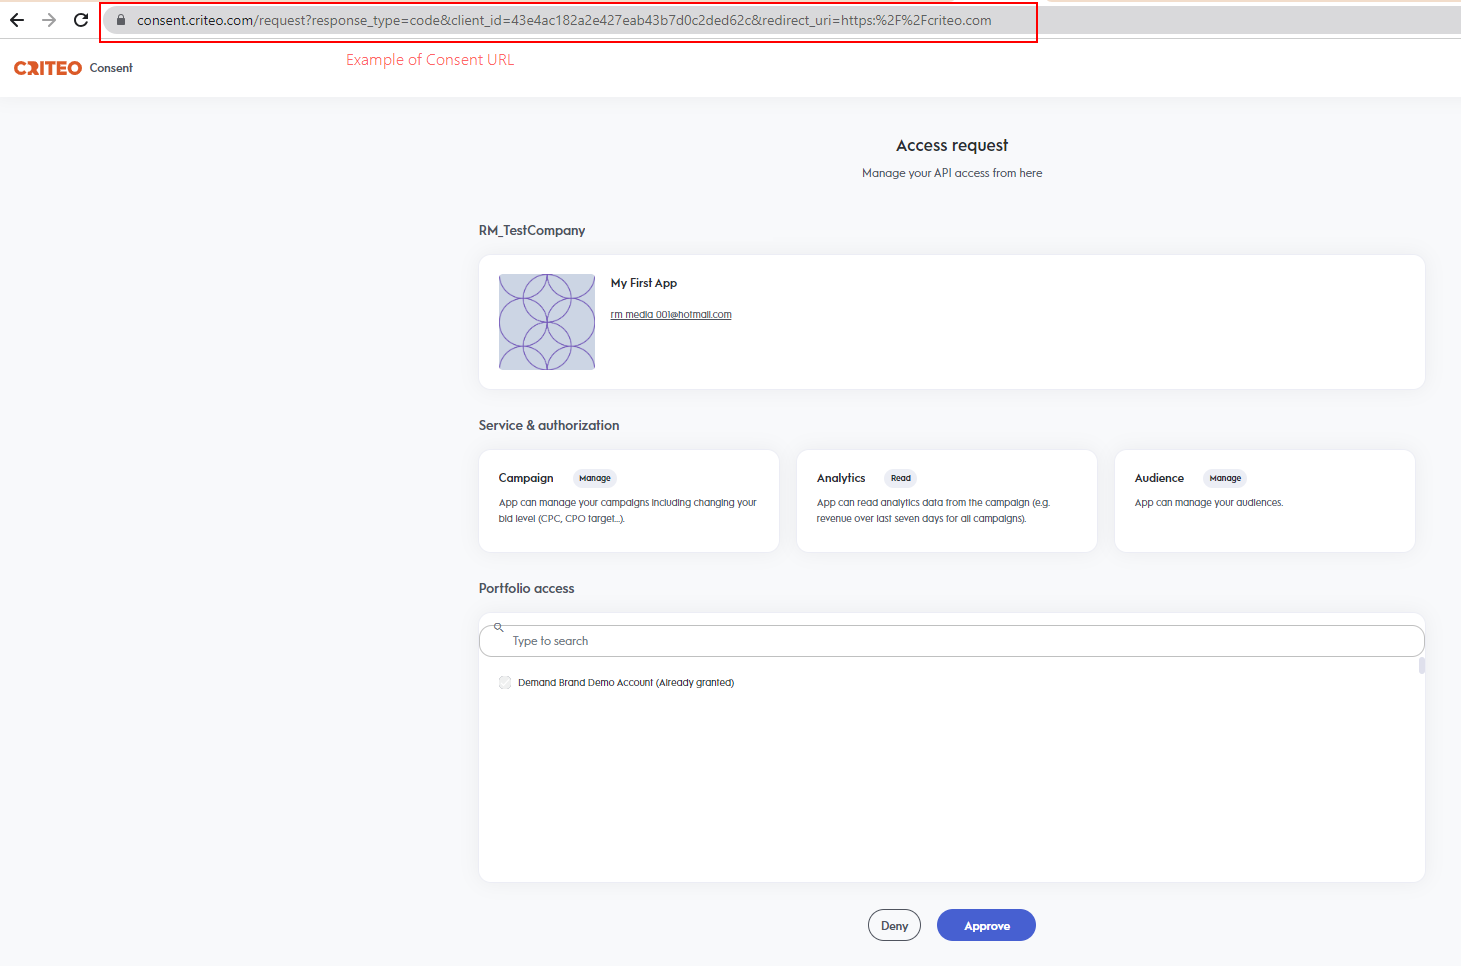
### Consent URL Creation
Once your app parameters are set, you can implement the authorization code flow.
#### Consent URL
1. To request access, create a Consent link that redirects the user, using the following structure:
**Authorization Code v. Client Credentials Consent URLs**
If you're familiar with the Client Credentials workflow, you might notice that the `Generate Consent URL` button is not present in the partner portal for the authorization code workflow. This is because, with the authorization code method, you need to provide a redirect URI specific to your organization. Therefore, these URLs must be configured directly within your workflow.
You will need to construct a consent URL similar to the example below while passing the required parameters for your application:
```http URL theme={null}
https://consent.criteo.com/request?response_type=code&client_id={client_id}&redirect_uri={redirect_uri}&state={state}
```
| Parameters | Required | Description |
| -------------------- | -------- | -------------------------------------------------------------------------- |
| `response_type=code` | Yes | Indicates that an authorization code is expected as outcome. |
| `client_id` | Yes | Your public key from the app credentials section. |
| `redirect_uri` | Yes | The URL to redirect the user after consent. Must match the configured URI. |
| `state` | No | Optional string to prevent Cross-Site Request Forgery attacks. |
2. The consent link directs users to the `Criteo Consent page`, where they can select which advertisers to grant access to and approve the request.
***
## Step 2. Set Up Your OAuth Parameters
After defining your application’s scope, set up the necessary parameters for the authorization code workflow.
| Parameters | Description |
| --------------- | ---------------------------------------------------------------------------------------------------------------------------------------------------------------- |
| `client_id` | Your public key, accessible in the app credentials section. You can manage up to 5 pairs of credentials, even after the app has been activated. |
| `client_secret` | Your secret key, accessible only once when creating a pair of `client_id` and `client_secret`. You can manage up to 5 pairs of credentials after app activation. |
| `redirect_uri` | The URL to redirect the user to after consent. Requires HTTPS. You can add up to 30 redirect URIs, manageable after app activation. |
You can now publish the app and initiate the authorization code workflow.
***
### Consent URL Creation
Once your app parameters are set, you can implement the authorization code flow.
#### Consent URL
1. To request access, create a Consent link that redirects the user, using the following structure:
**Authorization Code v. Client Credentials Consent URLs**
If you're familiar with the Client Credentials workflow, you might notice that the `Generate Consent URL` button is not present in the partner portal for the authorization code workflow. This is because, with the authorization code method, you need to provide a redirect URI specific to your organization. Therefore, these URLs must be configured directly within your workflow.
You will need to construct a consent URL similar to the example below while passing the required parameters for your application:
```http URL theme={null}
https://consent.criteo.com/request?response_type=code&client_id={client_id}&redirect_uri={redirect_uri}&state={state}
```
| Parameters | Required | Description |
| -------------------- | -------- | -------------------------------------------------------------------------- |
| `response_type=code` | Yes | Indicates that an authorization code is expected as outcome. |
| `client_id` | Yes | Your public key from the app credentials section. |
| `redirect_uri` | Yes | The URL to redirect the user after consent. Must match the configured URI. |
| `state` | No | Optional string to prevent Cross-Site Request Forgery attacks. |
2. The consent link directs users to the `Criteo Consent page`, where they can select which advertisers to grant access to and approve the request.
 **Notes**
A consent request will not be displayed if:
* The `client_id` does not match a published API app.
* The `redirect_uri` is unauthorized.
* There is an unexpected backend error.
In any of the cases above an error message will be displayed.
***
### Redirection and Access Code
Upon completing the Consent Delegation, users are redirected to a URL similar to the example below:
```http URL theme={null}
https://www.yourdomain.com/?code=58f4cd15-8087-48af-bab7-bba06d2df1da&state=4lr4e
```
This URL is forged with the authorized `redirect_uri` and the following query parameters:
| Parameter | Description |
| --------- | -------------------------------------------------------- |
| `code` | A single-use authorization code valid for 60 seconds. |
| `state` | The originally provided state parameter, returned as-is. |
If consent is denied, the redirect will include an `error` query parameter instead of a `code`.
***
## Step 3. Exchanging Access Code For Access Token
With an authorization code, you can request an access token via a `POST` request:
```bash cURL theme={null}
curl -X POST https://api.criteo.com/oauth2/token \
-H "Content-Type: application/x-www-form-urlencoded" \
-d "grant_type=authorization_code&code={code}&redirect_uri={redirect_uri}&client_id={client_id}&client_secret={client_secret}"
```
### Example
```bash cURL theme={null}
curl -L 'https://api.criteo.com/oauth2/token?grant_type=authorization_code&client_id=&client_secret=&redirect_uri=' \
-H 'Content-Type: application/x-www-form-urlencoded' \
-d 'client_id=' \
-d 'client_secret=' \
-d 'redirect_uri=' \
-d 'code=' \
-d 'grant_type=authorization_code'
```
| Parameter | Description |
| ------------------------------- | ---------------------------------------------------------------- |
| `grant_type=authorization_code` | Indicates that you are providing an authorization code |
| `code` | Authorization code returned during redirection |
| `redirect_uri` | Must match the `redirect_uri` used for the authorization request |
| `client_id` | Your public key from the app credentials |
| `client_secret` | Your secret key, accessible when creating credentials |
The response from Criteo API will be the following:
```json JSON theme={null}
{
"access_token": "eyJhbGciOi",
"token_type": "Bearer",
"refresh_token": "eyJhbGciO",
"expires_in": 900
}
```
| Parameter | Description |
| ------------------- | ----------------------------------------------------------------------------------------------------------------------- |
| `access_token` | A short-lived (valid for 900 seconds) access token. |
| `refresh_token` | A long-lived refresh token (that expires after 6 months) that can be used to renew the access token (see next section). |
| `token_type=Bearer` | Type of token. |
| `expires_in` | Lifetime of the token in seconds. |
**Token Lifetime**
The refresh token will be revoked if the user changes roles or leaves the organization. The account must be re-authorized through the consent flow by a new administrator.
***
### Using the refresh token
To renew an access token, use the following request:
```bash cURL theme={null}
curl -X POST https://api.criteo.com/oauth2/token \
-H "Content-Type: application/x-www-form-urlencoded" \
-d "grant_type=authorization_code&code={code}&redirect_uri={redirect_uri}&client_id={client_id}&client_secret={client_secret}"
```
| Parameter | Description |
| -------------------------- | --------------------------------------------------------------------------------------------------------------------- |
| `grant_type=refresh_token` | Indicates that you are providing a refresh token. |
| `refresh_token` | Refresh token shared when requesting an access token. |
| `client_id` | Your public key accessible in app credentials section. |
| `client_secret` | Your secret key, accessible only once when creating a pair of `client_id `and `client_secret` in credentials section. |
The response will be the same as when issuing an access token
***
# Demo
Below is a demo application code (index.js) in **NodeJS** using the **Express JS** framework:
```js JavaScript expandable theme={null}
var express = require('express');
var passport = require('passport');
var OAuth2Strategy = require('passport-oauth2').Strategy;
var app = express();
var port = 3000;
// Passport setup
passport.use(new OAuth2Strategy({
clientID: 'CLIENT_ID', // Enter your client_id here
clientSecret: 'CLIENT_SECRET', // Enter your client_secret here
authorizationURL: 'https://consent.criteo.com/request',
callbackURL: `http://localhost:${port}/criteo-auth/callback`,
tokenURL: 'https://api.criteo.com/oauth2/token',
state: 'togorot'
},
function(accessToken, refreshToken, profile, cb) {
cb(null, { accessToken, refreshToken });
}
));
app.use(passport.initialize());
// Route declarations
app.get('/', function(req, res) {
res.send('Link my Criteo account!');
});
app.get('/criteo-auth', passport.authenticate('oauth2'));
app.get('/criteo-auth/callback',
passport.authenticate('oauth2', { session: false }),
function(req, res) {
res.send(`
**Notes**
A consent request will not be displayed if:
* The `client_id` does not match a published API app.
* The `redirect_uri` is unauthorized.
* There is an unexpected backend error.
In any of the cases above an error message will be displayed.
***
### Redirection and Access Code
Upon completing the Consent Delegation, users are redirected to a URL similar to the example below:
```http URL theme={null}
https://www.yourdomain.com/?code=58f4cd15-8087-48af-bab7-bba06d2df1da&state=4lr4e
```
This URL is forged with the authorized `redirect_uri` and the following query parameters:
| Parameter | Description |
| --------- | -------------------------------------------------------- |
| `code` | A single-use authorization code valid for 60 seconds. |
| `state` | The originally provided state parameter, returned as-is. |
If consent is denied, the redirect will include an `error` query parameter instead of a `code`.
***
## Step 3. Exchanging Access Code For Access Token
With an authorization code, you can request an access token via a `POST` request:
```bash cURL theme={null}
curl -X POST https://api.criteo.com/oauth2/token \
-H "Content-Type: application/x-www-form-urlencoded" \
-d "grant_type=authorization_code&code={code}&redirect_uri={redirect_uri}&client_id={client_id}&client_secret={client_secret}"
```
### Example
```bash cURL theme={null}
curl -L 'https://api.criteo.com/oauth2/token?grant_type=authorization_code&client_id=&client_secret=&redirect_uri=' \
-H 'Content-Type: application/x-www-form-urlencoded' \
-d 'client_id=' \
-d 'client_secret=' \
-d 'redirect_uri=' \
-d 'code=' \
-d 'grant_type=authorization_code'
```
| Parameter | Description |
| ------------------------------- | ---------------------------------------------------------------- |
| `grant_type=authorization_code` | Indicates that you are providing an authorization code |
| `code` | Authorization code returned during redirection |
| `redirect_uri` | Must match the `redirect_uri` used for the authorization request |
| `client_id` | Your public key from the app credentials |
| `client_secret` | Your secret key, accessible when creating credentials |
The response from Criteo API will be the following:
```json JSON theme={null}
{
"access_token": "eyJhbGciOi",
"token_type": "Bearer",
"refresh_token": "eyJhbGciO",
"expires_in": 900
}
```
| Parameter | Description |
| ------------------- | ----------------------------------------------------------------------------------------------------------------------- |
| `access_token` | A short-lived (valid for 900 seconds) access token. |
| `refresh_token` | A long-lived refresh token (that expires after 6 months) that can be used to renew the access token (see next section). |
| `token_type=Bearer` | Type of token. |
| `expires_in` | Lifetime of the token in seconds. |
**Token Lifetime**
The refresh token will be revoked if the user changes roles or leaves the organization. The account must be re-authorized through the consent flow by a new administrator.
***
### Using the refresh token
To renew an access token, use the following request:
```bash cURL theme={null}
curl -X POST https://api.criteo.com/oauth2/token \
-H "Content-Type: application/x-www-form-urlencoded" \
-d "grant_type=authorization_code&code={code}&redirect_uri={redirect_uri}&client_id={client_id}&client_secret={client_secret}"
```
| Parameter | Description |
| -------------------------- | --------------------------------------------------------------------------------------------------------------------- |
| `grant_type=refresh_token` | Indicates that you are providing a refresh token. |
| `refresh_token` | Refresh token shared when requesting an access token. |
| `client_id` | Your public key accessible in app credentials section. |
| `client_secret` | Your secret key, accessible only once when creating a pair of `client_id `and `client_secret` in credentials section. |
The response will be the same as when issuing an access token
***
# Demo
Below is a demo application code (index.js) in **NodeJS** using the **Express JS** framework:
```js JavaScript expandable theme={null}
var express = require('express');
var passport = require('passport');
var OAuth2Strategy = require('passport-oauth2').Strategy;
var app = express();
var port = 3000;
// Passport setup
passport.use(new OAuth2Strategy({
clientID: 'CLIENT_ID', // Enter your client_id here
clientSecret: 'CLIENT_SECRET', // Enter your client_secret here
authorizationURL: 'https://consent.criteo.com/request',
callbackURL: `http://localhost:${port}/criteo-auth/callback`,
tokenURL: 'https://api.criteo.com/oauth2/token',
state: 'togorot'
},
function(accessToken, refreshToken, profile, cb) {
cb(null, { accessToken, refreshToken });
}
));
app.use(passport.initialize());
// Route declarations
app.get('/', function(req, res) {
res.send('Link my Criteo account!');
});
app.get('/criteo-auth', passport.authenticate('oauth2'));
app.get('/criteo-auth/callback',
passport.authenticate('oauth2', { session: false }),
function(req, res) {
res.send(`Authentication successful!
Access token:
Refresh token:
`);
}
);
console.log(`OAuth test app started on http://localhost:${port}`);
app.listen(port);
```
```json JSON theme={null}
{
"name": "oauth-node",
"version": "1.0.0",
"description": "",
"main": "index.js",
"scripts": {
"start": "node index.js"
},
"author": "",
"license": "ISC",
"dependencies": {
"ejs": "^3.1.6",
"express": "^4.17.1",
"passport": "^0.4.1",
"passport-oauth2": "^1.6.0"
}
}
```
***
## Run the demo
1. Run `npm install`,
2. Connect to the developer portal and create an app.
3. Create an "Authorization code" app.
4. Generate app credentials and enter the `client_id `and `client_secret` in `index.js`.
5. Register "[http://localhost:3000/criteo-auth/callback](http://localhost:3000/criteo-auth/callback)" as the redirect URI.
6. Run `npm run start`,
7. Open [http://localhost:3000](http://localhost:3000).
***
**What if my `client_id` and `client_secret` are compromised?**
Delete the credentials in the App page and create new ones. Users will need to re-authorize access.
***
**What’s Next**
* [Developer Accounts](/retail-media/v2025.01/docs/developer-accounts-organizations-apps)