> ## Documentation Index
> Fetch the complete documentation index at: https://developers.criteo.com/llms.txt
> Use this file to discover all available pages before exploring further.

# Private Market Programmatic Consent Granting

> Set up the two-app Admin and Business application model for programmatic consent granting in private market integrations.

# Overview

The programmatic consent granting process for private market will involve two API applications called the Admin app (client credentials) and the Business app (authorization code)

## Admin App

* Is responsible for account creation and consent granting,
* Will use the *client credential* workflow,
* A retailer admin will grant consent on behalf of a retailer's supply account (using consent portal),
* The admin app will use the new "***Accounts***" domain only, to manage accounts programmatically.

## Business App

* Will be responsible for all API operations on behalf of private market demand accounts,
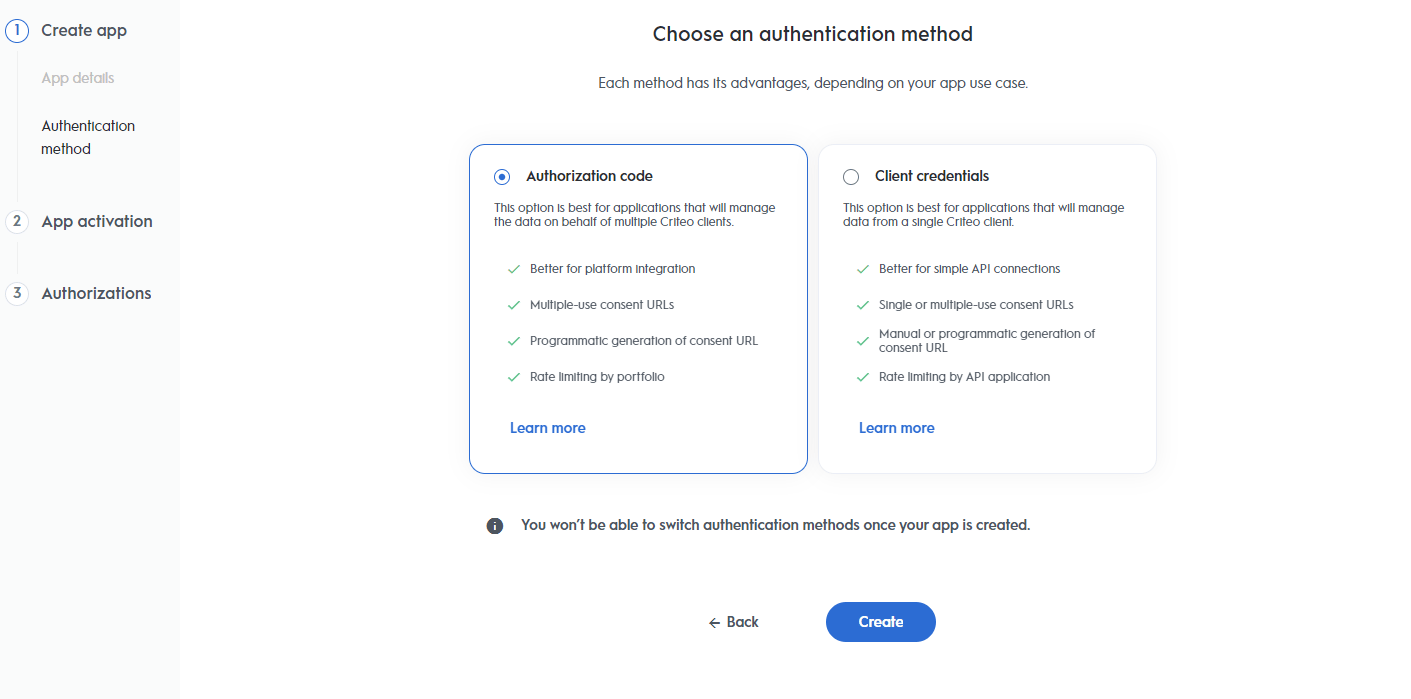
* Will use the *authorization code* workflow,
* Consent will be managed through the admin app,
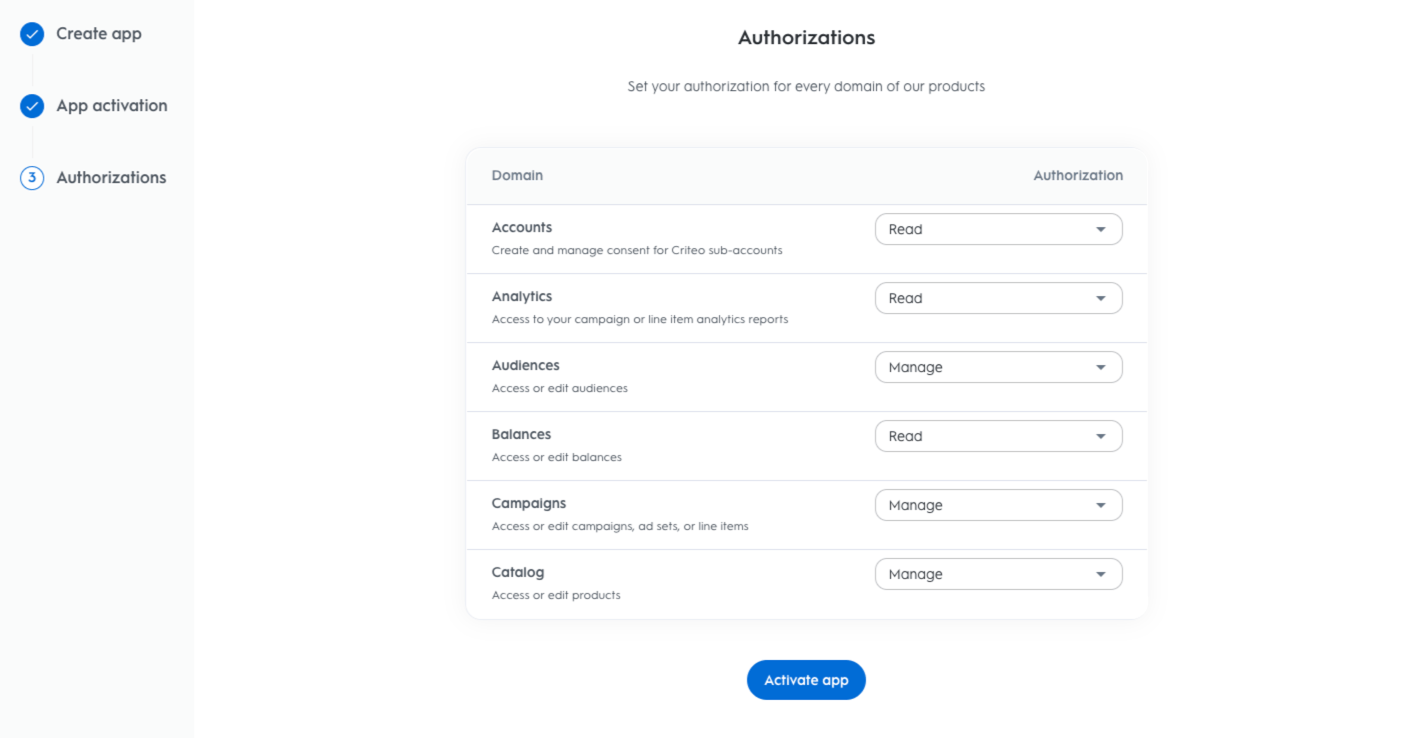
* The business app may manage different business entities from all domains (Analytics, Audience, Campaigns, Catalog) except the "***Accounts***" domain (managed exclusively through the admin app).

***

# Admin Application

1. Log into your [partners.criteo.com](https://partners.criteo.com/dashboard/442/apps) account to create the Admin app. In following steps we will need to create a new "Client Credentials" application

## Step 1 . Creating your admin application

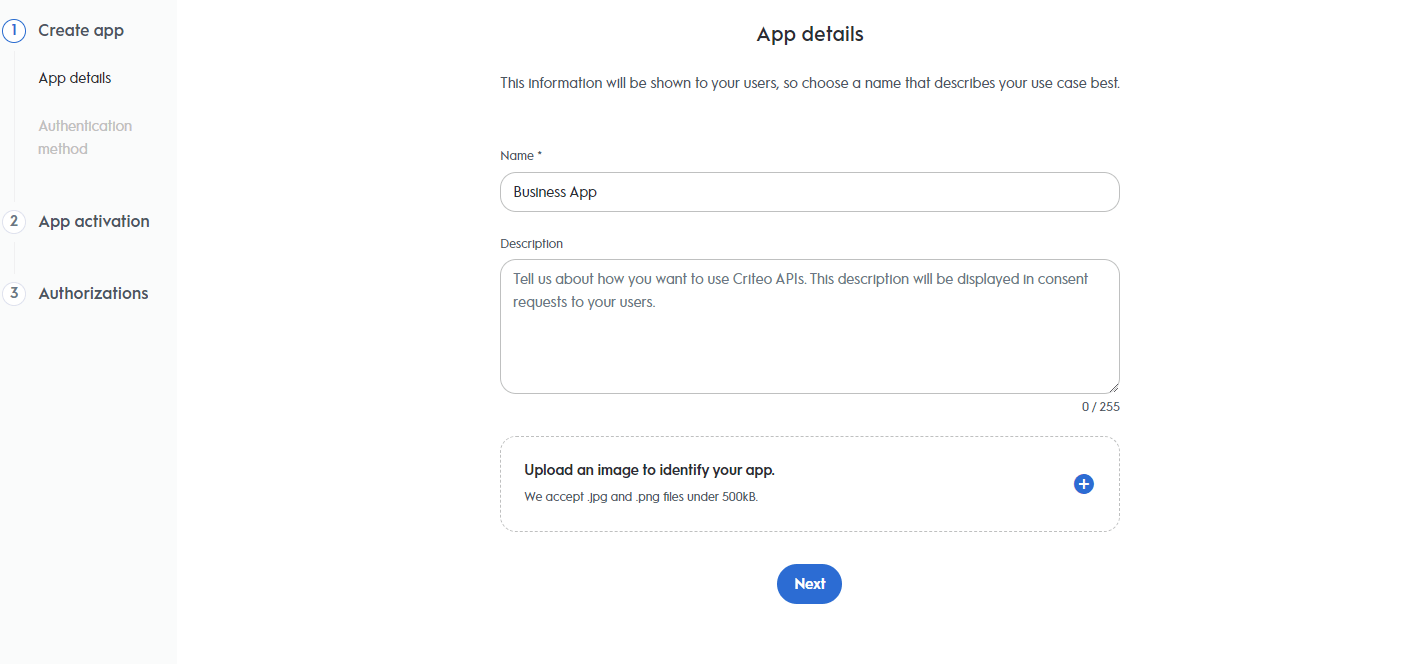
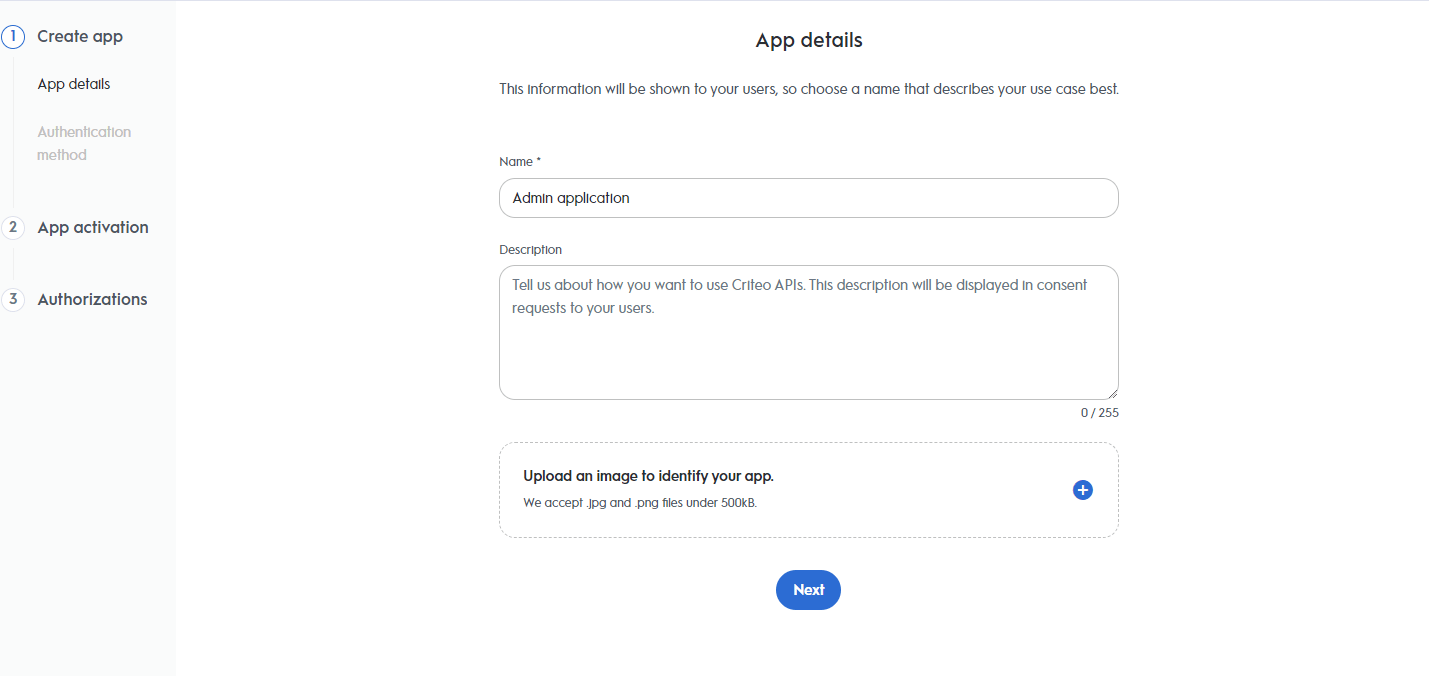
1. Begin creating the admin application by providing the app details and click next

<Frame>
  <img src="https://mintcdn.com/criteo-e1682996/KL9i4BnMuq4R7Zhu/images/retail-media/docs/228926e-image.png?fit=max&auto=format&n=KL9i4BnMuq4R7Zhu&q=85&s=b1bff5c700ba2e0443263cc8ed2bd048" width="1429" height="676" data-path="images/retail-media/docs/228926e-image.png" />
</Frame>

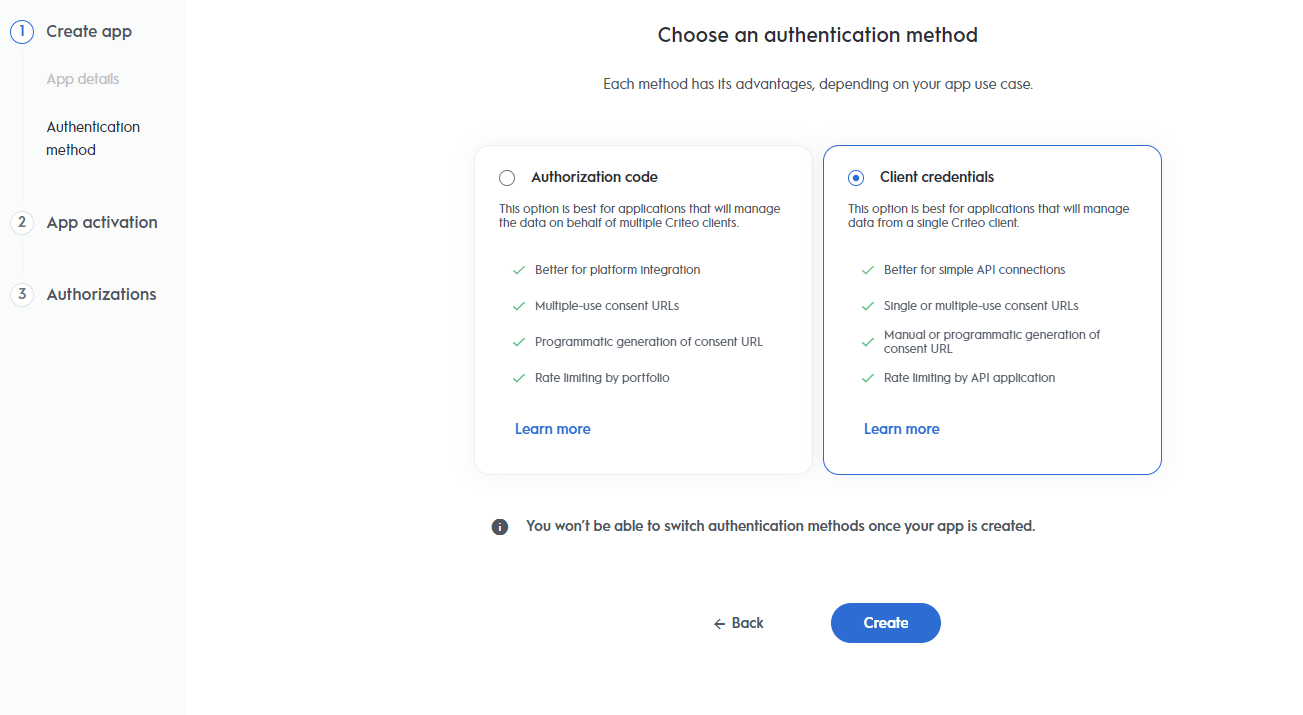
2. For the admin application we will be using the Client Credentials as the authentication method. Choose the option and click create
<Frame>
  <img src="https://mintcdn.com/criteo-e1682996/KL9i4BnMuq4R7Zhu/images/retail-media/docs/ce977aa-image.png?fit=max&auto=format&n=KL9i4BnMuq4R7Zhu&q=85&s=4c613a9dce60d99526ad5635a13e1f6d" width="1303" height="715" data-path="images/retail-media/docs/ce977aa-image.png" />
</Frame>

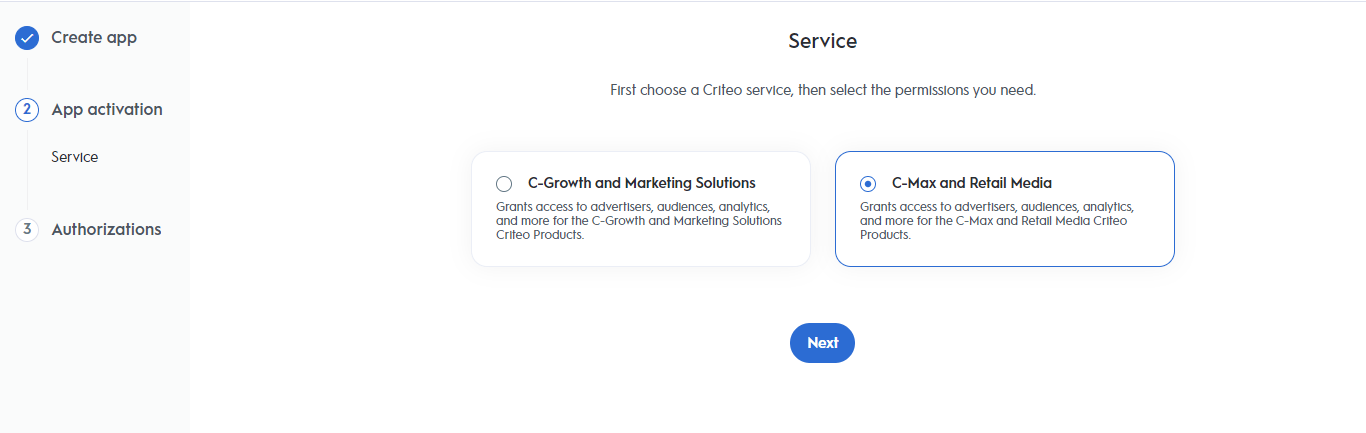
3. Select the C-Max and Retail media as your application service\\
   <Frame>
     <img src="https://mintcdn.com/criteo-e1682996/KL9i4BnMuq4R7Zhu/images/retail-media/docs/3dc256f-image.png?fit=max&auto=format&n=KL9i4BnMuq4R7Zhu&q=85&s=ebd4e81621913fc4a2a7d9ab4380e3aa" width="1366" height="433" data-path="images/retail-media/docs/3dc256f-image.png" />
   </Frame>
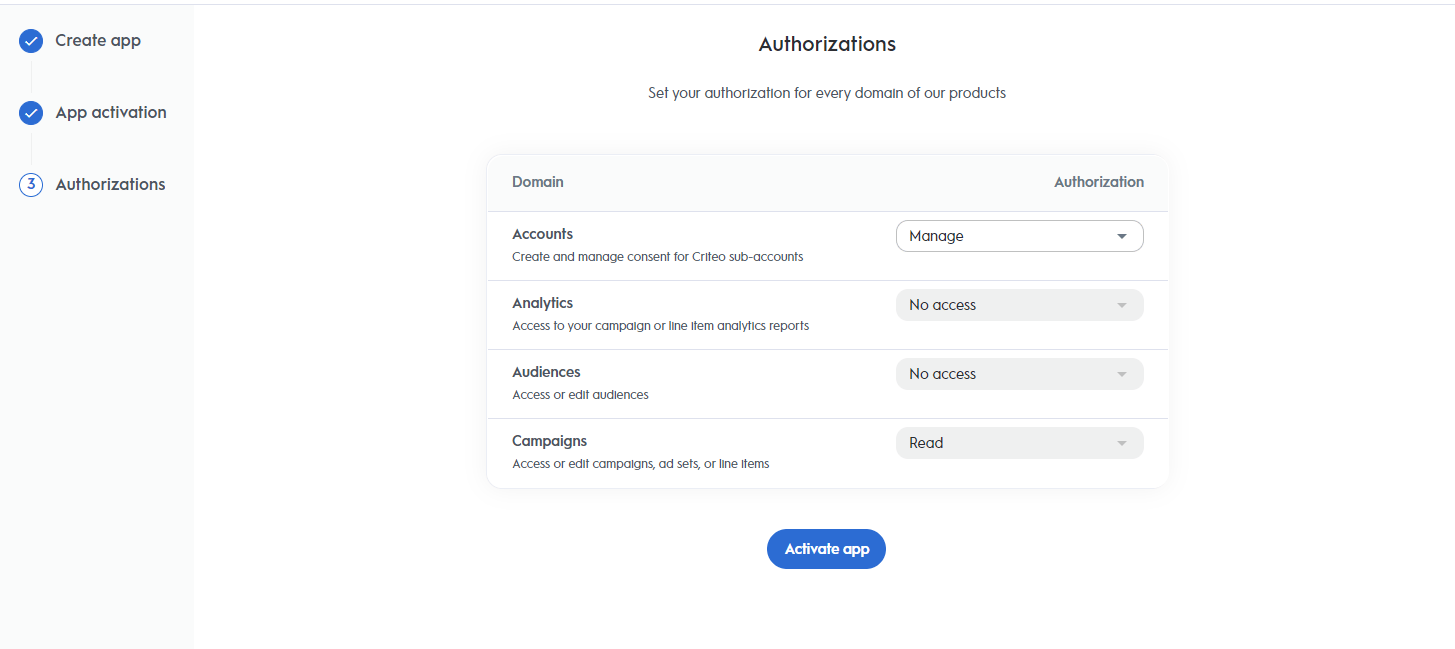
4. Select only the "Accounts" domain and provide manage access
<Frame>
  <img src="https://mintcdn.com/criteo-e1682996/KL9i4BnMuq4R7Zhu/images/retail-media/docs/32dfbf3-image.png?fit=max&auto=format&n=KL9i4BnMuq4R7Zhu&q=85&s=055ca66348222bb4f70fc9d0e271edde" width="1455" height="649" data-path="images/retail-media/docs/32dfbf3-image.png" />
</Frame>

<Info>
  **Information**

  When selecting the Accounts domain you will be shown the message, **Applications that select “Manage Accounts” will also be granted Campaign Read permissions. This option cannot be combined with any other authorization type.** This is expected and you can just click "Got it" button. Campaign read will be added automatically as it is currently needed to fetch the accounts
</Info>

3. Click "Activate App"
4. In the App credentials section of your app details, click "Create new key" to download your keys. Store them somewhere safely
5. Generate a consent URL and send it to your account administrator. Users with admin, business manager or technical managers roles are allowed to grant consent.

***

# Business Application

## Step 2. Creating your business application

Start creating the admin application by providing the app details and click "**Next**":

<Frame>
  <img src="https://mintcdn.com/criteo-e1682996/KL9i4BnMuq4R7Zhu/images/retail-media/docs/0a208b5-image.png?fit=max&auto=format&n=KL9i4BnMuq4R7Zhu&q=85&s=bd854cabd2cc83e0d2bb7d5916c9e4a9" width="1405" height="664" data-path="images/retail-media/docs/0a208b5-image.png" />
</Frame>

For the Business Application, we will be using the Authorization Code as the authentication method. Choose this option and click "**Create**"
<Frame>
  <img src="https://mintcdn.com/criteo-e1682996/KL9i4BnMuq4R7Zhu/images/retail-media/docs/42ec0b9-image.png?fit=max&auto=format&n=KL9i4BnMuq4R7Zhu&q=85&s=75c62ec89efc64f5c9e8867c09d4df64" width="1411" height="699" data-path="images/retail-media/docs/42ec0b9-image.png" />
</Frame>

3. Select "***C-Max and Retail Media***" as your application service

4. Select all relevant authorizations domains that your users will need to access - for more information, check [Create your app](/retail-media/v2027.01-rc/docs/create-your-app#step-3---authorizations):
<Frame>
  <img src="https://mintcdn.com/criteo-e1682996/KL9i4BnMuq4R7Zhu/images/retail-media/docs/0ca3b3e9251f19a6d53653a851a688563cf669b4733d135a06611e2c9599abc9-Google_Chrome_2025-01-28_11.46.31.png?fit=max&auto=format&n=KL9i4BnMuq4R7Zhu&q=85&s=c9b96df19b6b65ac908ba3ff7c03cfa7" alt="Authorizations for Business Apps" width="1415" height="738" data-path="images/retail-media/docs/0ca3b3e9251f19a6d53653a851a688563cf669b4733d135a06611e2c9599abc9-Google_Chrome_2025-01-28_11.46.31.png" />
</Frame>

3. Click "***Activate App***"

4. In the App credentials section of your app details, click "**Create new key**" to download your keys. Store them somewhere safely

## Redirect URI

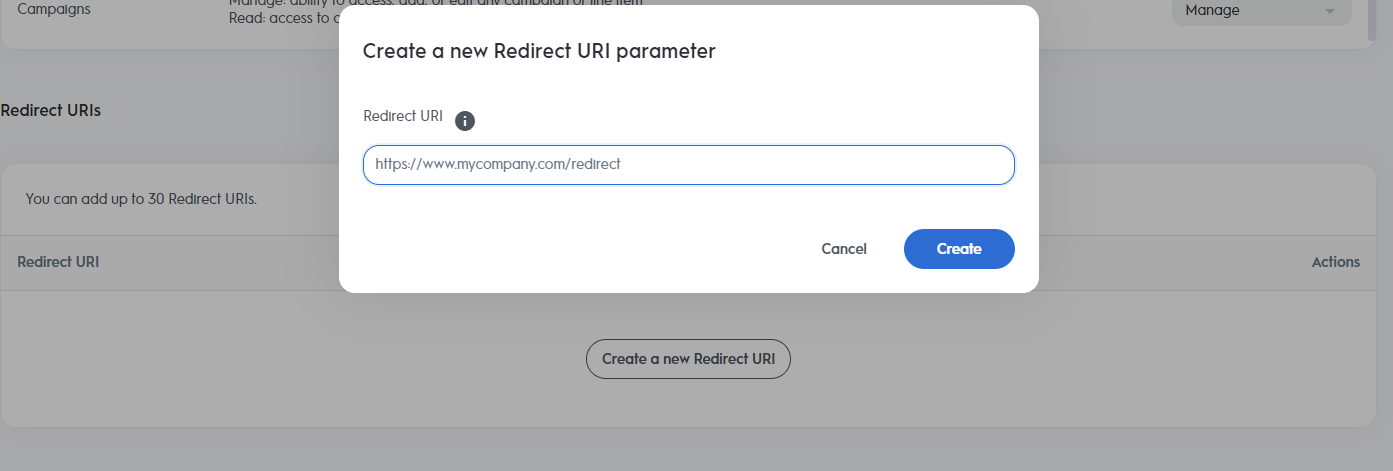
In the Redirect URI section of your app details, register the `callbackUrl` where Criteo API will send your authorization code when consent is granted
<Frame>
  <img src="https://mintcdn.com/criteo-e1682996/KL9i4BnMuq4R7Zhu/images/retail-media/docs/02e1f6f-image.png?fit=max&auto=format&n=KL9i4BnMuq4R7Zhu&q=85&s=d3693d46755e56d672a96728083bfb23" width="1393" height="471" data-path="images/retail-media/docs/02e1f6f-image.png" />
</Frame>

***

# Demo with Postman

In the following demo we will do a simple step by step using Postman

## Step 3. Authenticate the Criteo API with the Admin app

1. Generate a token for your Admin App with the Credentials created in step 1.4. In this step you will need to run a `POST` call to `/oauth2/token`:

**Sample Request**

```bash theme={null}
curl -X POST "https://api.criteo.com/oauth2/token" \
  -d 'grant_type=client_credentials' \
  -d 'client_id={ADMIN_CLIENT_ID}' \
  -d 'client_secret={ADMIN_CLIENT_SECRET}'
```

**Sample Response**

```json theme={null}
{
    "access_token": "&lt;TOKEN STRING&gt;",
    "token_type": "Bearer",
    "expires_in": 900
}
```

**Postman Example**
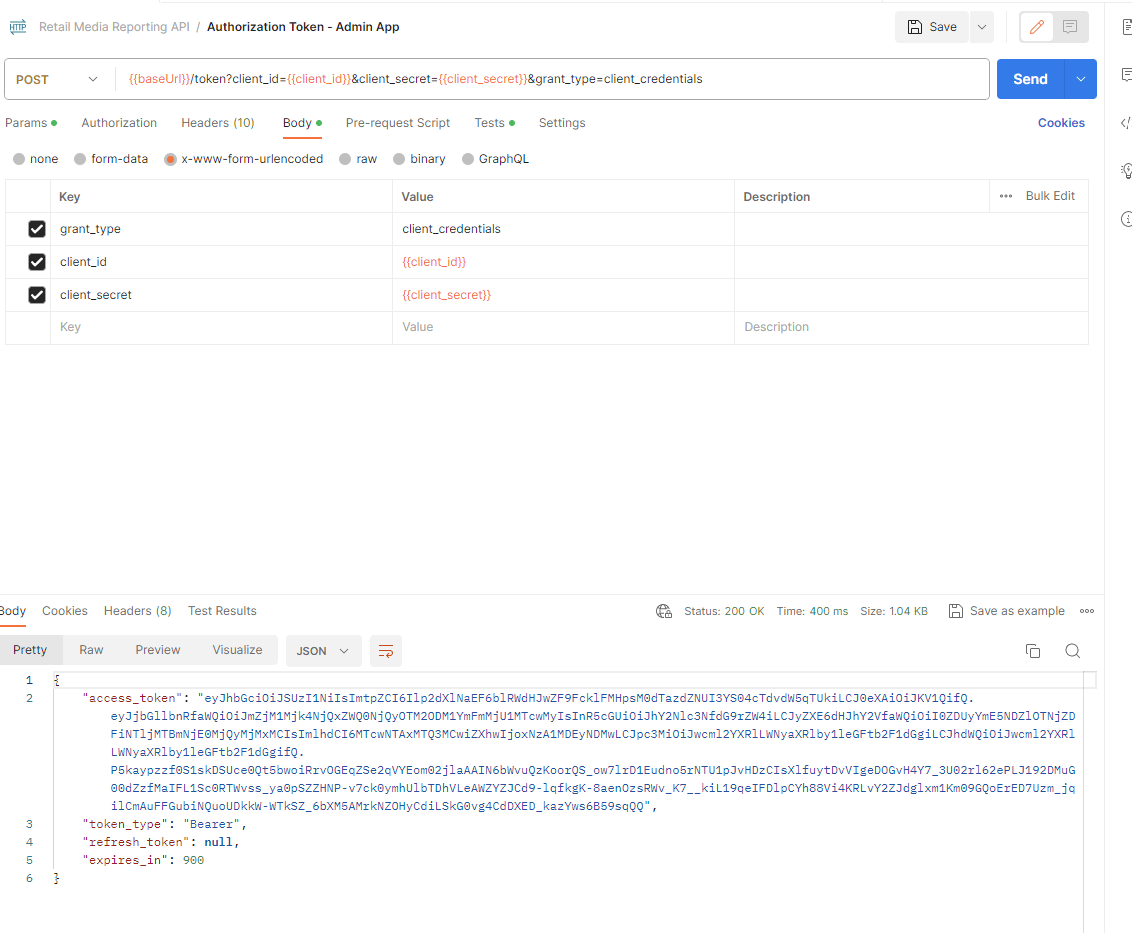
<Frame caption="After authenticating you will receive the access token. Use this access token in the next step to grant the account consent">
  <img src="https://mintcdn.com/criteo-e1682996/KL9i4BnMuq4R7Zhu/images/retail-media/docs/e2b810a-image.png?fit=max&auto=format&n=KL9i4BnMuq4R7Zhu&q=85&s=873217b801284d5ede758f784b8e1a7e" alt="After authenticating you will receive the access token. Use this access token in the next step to grant the account consent" width="1132" height="933" data-path="images/retail-media/docs/e2b810a-image.png" />
</Frame>

***

## Step 4. Grant Account Consent

1. Using the token generated in step 3.1, make a `POST` call to the consent grant endpoint. The endpoint should respond with a 204 response status.

```bash theme={null}
curl -L -X POST 'https://api.criteo.com/{version}/retail-media/accounts/{demandAccountId}/grant-consent' \
  -H 'Content-Type: application/json' \
  -H 'Authorization: Bearer <ACCESS_TOKEN_FROM_ADMIN_APP>' \
  -d '{
    "data":{
        "type": "GrantConsentModel",
        "attributes": {
            "clientId": "{BUSINESS_APP_CLIENT_ID}",
            "callbackUrl": "{BUSINESS_APP_CALLBACK_URL}", // the redirect uri you registered on the partner portal 
            "callbackState": "{DEMAND_ACCOUNT_ID}" // this is an optional parameter but we recommend you pass the account id so you can association it with the right token
        }
    }
}'
```

### Grant Consent Attributes

* `clientId` - your business client id that was generated in step 2.6
* `callbackUrl` - the redirect uri you registered on the partner portal
* `callbackState` (optional) - This is an optional parameter, but we recommend you pass the account` id` so you can associate it with the right token.

***

## Step 5. Exchange Auth. Code Token Linked to Demand Account

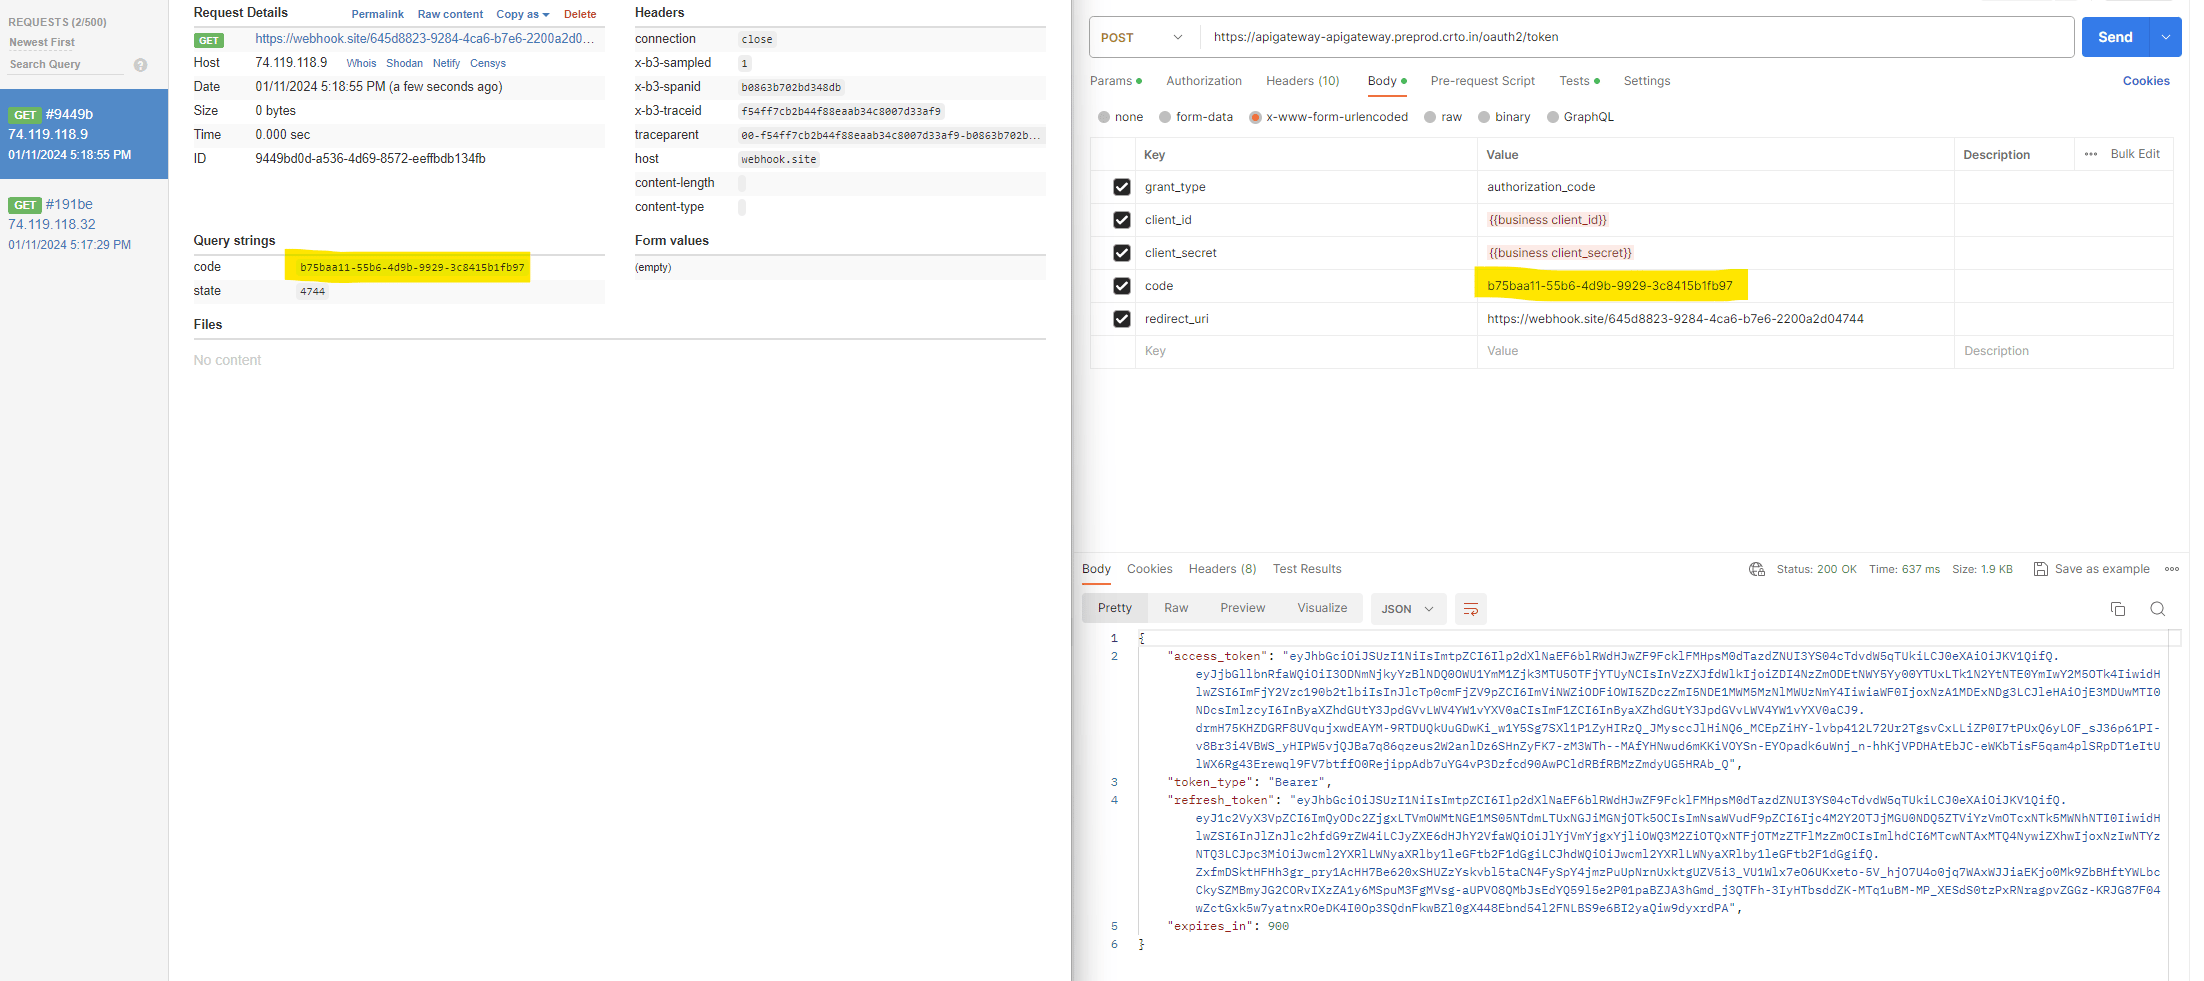
1. As soon as you’ve completed step 4.1 you should receive a callback to your callback URL with the code. Use the code to make an addition `POST` call to `/oauth2/token` with code. The business app should use this token to request a pair of access and refresh tokens.

```bash theme={null}
curl -L -X POST 'https://api.criteo.com/oauth2/token' \
  -H 'Authorization: Bearer <MY_ACCESS_TOKEN>' \
  -d 'grant_type=authorization_code' \
  -d 'client_id={BUSINESS_APP_CLIENT_ID}' \
  -d 'client_secret={BUSINESS_APP_CLIENT_SECRET}' \
  -d 'code={CODE}' \
  -d 'redirect_uri={BUSINESS_APP_CALLBACK_URL}'
```

<Frame caption="**Example**: On the right, after completing step 4.1 our callback URL receives the code. On the left a new POST authenticate call is made with the code">
  <img src="https://mintcdn.com/criteo-e1682996/KL9i4BnMuq4R7Zhu/images/retail-media/docs/38a22dc-image.png?fit=max&auto=format&n=KL9i4BnMuq4R7Zhu&q=85&s=501590f7b09f0bf41d59f90e719a95a4" alt="**Example**: On the right, after completing step 4.1 our callback URL receives the code. On the left a new POST authenticate call is made with the code" width="2204" height="981" data-path="images/retail-media/docs/38a22dc-image.png" />
</Frame>

2. You're now ready to make calls to Criteo API using the Business App

***

### Using the refresh token

To renew an access token, use the following request:

```bash theme={null}
curl -X POST https://api.criteo.com/oauth2/token \
-H "Content-Type: application/x-www-form-urlencoded" \
-d "grant_type=authorization_code&code={code}&redirect_uri={redirect_uri}&client_id={client_id}&client_secret={client_secret}"

```

<table>
  <thead>
    <tr>
      <th>
        <p>
          Parameter
        </p>
      </th>

      <th>
        <p>
          Description
        </p>
      </th>
    </tr>
  </thead>

  <tbody>
    <tr>
      <td>
        <p>
          <code>
            grant\_type=refresh\_token
          </code>
        </p>
      </td>

      <td>
        <p>
          Indicates that you are providing a refresh token.
        </p>
      </td>
    </tr>

    <tr>
      <td>
        <p>
          <code>
            refresh\_token
          </code>
        </p>
      </td>

      <td>
        <p>
          Refresh token shared when requesting an access token.
        </p>
      </td>
    </tr>

    <tr>
      <td>
        <p>
          <code>
            client\_id
          </code>
        </p>
      </td>

      <td>
        <p>
          Your public key accessible in app credentials section.
        </p>
      </td>
    </tr>

    <tr>
      <td>
        <p>
          <code>
            client\_secret
          </code>
        </p>
      </td>

      <td>
        <p>
          Your secret key, accessible only once when creating a pair of

          <code>
            client\_id
          </code>

          and

          <code>
            client\_secret
          </code>

          in credentials section.
        </p>
      </td>
    </tr>
  </tbody>
</table>

The response will be the same as when issuing an access token.