> ## Documentation Index
> Fetch the complete documentation index at: https://developers.criteo.com/llms.txt
> Use this file to discover all available pages before exploring further.

# Video player implementation (App: iOS)

<Warning>
  **Hidden page**

  This page is currently hidden in Criteo's documentation. This means it won't appear in the navigation menu and is only accessible with the link. To return to this page in the future, please make sure to bookmark it.
</Warning>

<Info>
  **Commerce Video for Apps is in Beta**

  The documentation and features are likely to change, and the product might contain bugs.\
  Please report any issues and check back for updates.
</Info>

***

# Introduction

This document aims at providing a detailed guideline about **implementing On-Site Commerce Video ads on mobile platform, for iOS.**

<Info>
  **Android vs iOS**

  **This page only covers the video player implementation for iOS**. Please refer to [this page](/retailer-integration/docs/video-player-implementation-app-android) for the Android implementation.
</Info>

<Info>
  **App vs web (desktop & mobile)**

  This page focuses on **mobile app implementation**. For a broader context, please visit the[ video player implementation guide for web.](/retailer-integration/docs/video-player-implementation-guide-desktopmobile)
</Info>

<Warning>
  **Version requirements**

  For iOS, the minimum iOS version supported is **9.0**, but you can choose to support the latest 5 versions.
</Warning>

***

# Video Player Implementation Guide

When it comes to building your video ad implementation, there are a few high-level steps to consider:

1. Requesting and parsing the VAST tag,
2. Creating the video player, that will show the ad,
3. Setting up an ad session,
4. Firing beacons at the proper time during video playback,
5. Finishing the ad session,
6. Handling closed captions.

<Info>
  Criteo supports **VAST 4.2** (the IAB specs are available [here](https://iabtechlab.com/wp-content/uploads/2019/06/VAST_4.2_final_june26.pdf)).
</Info>

***

## Step 1: requesting and parsing the VAST tag

To obtain the data for your video player, start by fetching the VAST information from the Criteo API Ad Response.

Here is an example of how to request the VAST file (if required) and how to parse it, using XPath, to retrieve:

* The link of the video media files,
* VAST XML tracking beacons,
* OMID Verification URL and `VerificationParameters `,
* Closed captions file.

```swift expandable theme={null}
public func fetchVAST(_ remoteURL: URL,
                          _ statusHandler: @escaping (_ message: String) -> (),
                          _ completionHandler: @escaping (_ videoAdURL: URL, 
                                                          _ captionsURL: URL,
                                                          _ verificationURL: String, 
                                                          _ verificationParameters: String, 
                                                          _ vendorKey: String, 
                                                          _ tracking: Dictionary&lt;String, URL&gt;) -> (),
                          _ errorHandler: @escaping (_ message: String) -> ()) {
    DispatchQueue.main.async {
        statusHandler("Fetching VAST...");
    }

    print("Fetching VAST from '\(remoteURL)'.")
    self.VASTDownloadTask = URLSession.shared.downloadTask(with: remoteURL) {
        (fileURL, response, error) in
        guard let fileURL = fileURL else {
            DispatchQueue.main.async {
                errorHandler("Unable to fetch VAST from remote URL: \(remoteURL)")
            }
            return
        }
        
        do {
            let fileData = try Data(contentsOf: fileURL)
            
            // Process the file data as needed
            let mediaFile = self.evaluateXPath(xmlString: fileData, xpath: "//MediaFile/text()");
            let captions = self.evaluateXPath(xmlString: fileData, xpath: "//ClosedCaptionFile/text()");
            let verifScript = self.evaluateXPath(xmlString: fileData, 
                                                 xpath: "//Verification[@vendor='criteo.com-omid']/JavaScriptResource/text()");
            let verifParameters = self.evaluateXPath(xmlString: fileData, 
                                                     xpath: "//Verification[@vendor='criteo.com-omid']/VerificationParameters/text()");
            
            // Retrieve VAST tracking URLs
            var tracking: Dictionary&lt;String, URL&gt; = Dictionary(minimumCapacity: 15);
            let events = self.evaluateXPath(xmlString: fileData, xpath: "//Linear/TrackingEvents/Tracking/@event");
            events.forEach {
                let url = self.evaluateXPath(xmlString: fileData, xpath: "//Linear/TrackingEvents/Tracking[@event='"+$0+"']");
                tracking[$0] = URL(string: url[0]);
            }
            tracking["impression"] = URL( string: self.evaluateXPath(xmlString: fileData, xpath: "//Impression")[0]);
            tracking["error"] = URL(string: self.evaluateXPath(xmlString: fileData, xpath: "//Error")[0]);
            tracking["click"] = URL(string: self.evaluateXPath(xmlString: fileData, xpath: "//VideoClicks/ClickTracking/text()")[0]);
            
            // create URLs
            let videoAdURL = URL(string: mediaFile[0])!;
            let captionsURL = URL(string: captions[0])!;
            let verificationURL = verifScript[0];            
            DispatchQueue.main.async {
                completionHandler(videoAdURL, captionsURL, verificationURL, verifParameters[0], "criteo", tracking)
            }
        } catch {
            DispatchQueue.main.async {
                errorHandler("Unable to read file content: \(error.localizedDescription)")
            }
        }
    }

    self.VASTDownloadTask?.resume()
}
```

And the parsing function to evaluate the XPath below:

```swift expandable theme={null}
private func evaluateXPath(xmlString: Data, xpath: String) -> [String] {
  var results: [String] = [];

  // Convert the XML string to a C string
  let bytes = UnsafeMutablePointer&lt;UInt8&gt;.allocate(capacity: xmlString.count + 1)
  defer { bytes.deallocate() }
  xmlString.copyBytes(to: bytes, count: xmlString.count)
  bytes[xmlString.count] = 0;
  let xmlCString = UnsafeRawPointer(bytes).assumingMemoryBound(to: CChar.self)

  // Parse the XML
  let xmlDoc = xmlParseDoc(xmlCString)
  guard let doc = xmlDoc else { return results }

  // Create an XPath context
  let xpathCtx = xmlXPathNewContext(doc)
  guard let context = xpathCtx else {
    xmlFreeDoc(doc)
    return results
  }

  // Evaluate the XPath expression
  let xpathObj = xmlXPathEvalExpression(xpath, context)
  guard let xpathObject = xpathObj else {
    xmlXPathFreeContext(context)
    xmlFreeDoc(doc)
    return results
  }

  // Extract the nodes
  let nodes = xpathObject.pointee.nodesetval
  if let nodeSet = nodes {
    for i in 0..<nodeSet.pointee.nodeNr {
      if let node = nodeSet.pointee.nodeTab[Int(i)] {
        if let content = xmlNodeGetContent(node) {
          let cString = content.withMemoryRebound(to: CChar.self, capacity: 1) { $0 }
          if let result = String(cString: cString, encoding: .utf8) {
            results.append(result)
          }
          xmlFree(content)
        }
      }
    }
  }

  // Clean up
  xmlXPathFreeObject(xpathObject)
  xmlXPathFreeContext(context)
  xmlFreeDoc(doc)

  return results
}
```

***

## Step 2: creating the video player

<Info>
  **UIKit vs SwiftUI**

  Our iOS example for the video player is built with `UIKit`, the traditional approach for building user interfaces using interface builder and View Controllers. If you are using `SwiftUI`, please refer to  [this Apple documentation](https://developer.apple.com/tutorials/swiftui/interfacing-with-uikit) to integrate `UIKit` views and view controllers inside `SwiftUI` views.
</Info>

Our video player is built with the native component`AVPlayer` which offers methods like `play()`, `pause()`, along with properties such as: `volume` and `duration` to help us interact with the video player. To follow the video player specifications, we incorporate button control elements for `Play/Pause` , `Mute/Unmute` and to `Enable/Disable CCs` (close captions) with click listeners.

Additionally, be aware that local regulations may require a **callout** or **pop-up** for mandatory notices.

In practice, we add a `UIView` called `playerView` for the player container in the interface builder. This view will also be associated to the ad session and interact with the OM SDK.

The video player can be created programmatically, and added to this container.

```swift theme={null}
func createMediaPlayer(withAsset asset: AVAsset) {
		let player = AVQueuePlayer()
    let looper = AVPlayerLooper(player: player, templateItem: AVPlayerItem(asset: asset!))

    player.isMuted = true
    self.attachUnMuteButtonImage()

    guard let videoView = playerView else {
      fatalError("VideoView is not initialized")
    }

    let videoPlayerLayer = AVPlayerLayer(player: player)
    videoPlayerLayer.bounds = videoView.bounds
    videoPlayerLayer.frame = videoView.bounds
    videoPlayerLayer.videoGravity = AVLayerVideoGravity.resizeAspect;
    videoPlayerLayer.player?.volume = 1.0;

    videoView.layer.insertSublayer(videoPlayerLayer, at: 0)
}
```

We use an `AVQueuePlayer` and `AVPlayerLooper` so the video ad loops infinitely instead of a simple `AVPlayer`. We also start the video muted by default, setting the `isMuted` property to true.

The media asset can be created with `let asset = AVAsset(url: localVideoURL)`. For creating a media asset with closed captions, see the section below.

***

## Step 3: setting up OMID ad session

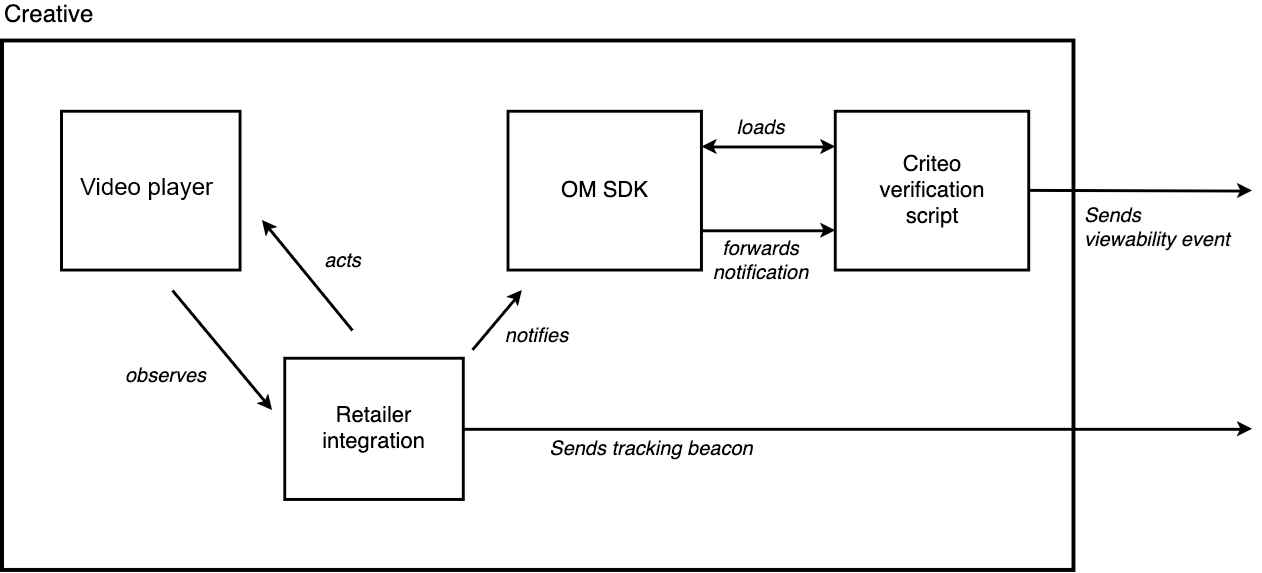
Clients must support OMID to enable their player to run additional scripts, hence allowing Criteo to track video viewability. This allows Criteo to send its own verification script within the VAST XML to track video viewability.

<Info>
  **About OMID**

  The [Open Measurement Interface Definition (OMID)](https://iabtechlab.com/standards/open-measurement-sdk/) is a standardized technology provided by IAB to measure and verify the viewability of digital ads, particularly video ads, across various platforms and devices.

  OMID provides a consistent framework for measuring viewability metrics, such as viewable impressions and viewable video plays, in compliance with industry standards. Implementing OMID offers accurate insights into ad performance and user engagement, and is also used to track video viewability the same way across all retailers, ensuring coherence across networks.

  OM SDK in this documentation refers to the **OM SDK for mobile platforms (iOS).**
</Info>

Section 3.16 of the [VAST specification](https://www.iab.com/wp-content/uploads/2016/04/VAST4.0_Updated_April_2016.pdf) outlines an optional `AdVerifications` element where these verifications reside. Each verification element nested inside `AdVerifications` details the resources needed for verification.

<Info>
  **The Open-measurement SDK**

  To handle these resources, we pass them to the Open-Measurement SDK provided by IAB. The official OM SDK implementation guide for iOS can be found [here](https://interactiveadvertisingbureau.github.io/Open-Measurement-SDKiOS/). The documentation provides full code snippets for each step to integrate viewability.
</Info>

At a high level, the process goes as follows:

* Load the OMID service script,
* Create an ad session configuration and the ad session itself,
* Register the player showing the ad and start the ad session,
* Trigger `adEvents` & `mediaEvents` events to OM SDK when Video & Ad related events occur.

<Warning>
  The [IAB implementation guide](https://interactiveadvertisingbureau.github.io/Open-Measurement-SDKiOS/) is not complete enough to cover all the Criteo video player specifications. For that reason, **it is highly recommended to also verify your integration following[the IAB documentation for iOS.](https://interactiveadvertisingbureau.github.io/Open-Measurement-SDKiOS/validation.html)** with the Criteo verification script.
</Warning>

<Frame>
  <img src="https://mintcdn.com/criteo-e1682996/PtO-HGDADAVLvs2M/images/retailer-integration/docs/96d3750dc86afc5ab1a34c348239ea59193c70c5c230401225fca1feec67fc7c-image.png?fit=max&auto=format&n=PtO-HGDADAVLvs2M&q=85&s=41ce9588920dea026b7a7b6df369e1c3" width="1262" height="573" data-path="images/retailer-integration/docs/96d3750dc86afc5ab1a34c348239ea59193c70c5c230401225fca1feec67fc7c-image.png" />
</Frame>

<Info>
  The Criteo verification script comes from the VAST XML file.
</Info>

Through the OM SDK, several events will be emitted by Criteo OMID Verification Script to Criteo servers:

<table>
  <thead>
    <tr>
      <th>
        <p>
          Level
        </p>
      </th>

      <th>
        <p>
          Beacon name
        </p>
      </th>

      <th>
        <p>
          Description
        </p>
      </th>
    </tr>
  </thead>

  <tbody>
    <tr>
      <td>
        <p>
          OMID (

          <code>
            VerificationParameters
          </code>

          )
        </p>
      </td>

      <td>
        <p>
          <code>
            omidTrackView
          </code>
        </p>
      </td>

      <td>
        <p>
          Indicates that the OMID Ad session was properly initialized.
        </p>
      </td>
    </tr>

    <tr>
      <td>
        <p>
          OMID (

          <code>
            VerificationParameters
          </code>

          )
        </p>
      </td>

      <td>
        <p>
          <code>
            start
          </code>
        </p>
      </td>

      <td>
        <p>
          Indicates that the video just started, and the video is displayed 100% in the viewport.
        </p>
      </td>
    </tr>

    <tr>
      <td>
        <p>
          OMID (

          <code>
            VerificationParameters
          </code>

          )
        </p>
      </td>

      <td>
        <p>
          <code>
            firstQuartile
          </code>
        </p>
      </td>

      <td>
        <p>
          Indicates that the video just reached the 25% quartile, and the video is displayed 100% in the viewport.
        </p>
      </td>
    </tr>

    <tr>
      <td>
        <p>
          OMID (

          <code>
            VerificationParameters
          </code>

          )
        </p>
      </td>

      <td>
        <p>
          <code>
            midpoint
          </code>
        </p>
      </td>

      <td>
        <p>
          Indicates that the video just reached the 50% quartile, and the video is displayed 100% in the viewport.
        </p>
      </td>
    </tr>

    <tr>
      <td>
        <p>
          OMID (

          <code>
            VerificationParameters
          </code>

          )
        </p>
      </td>

      <td>
        <p>
          <code>
            thirdQuartile
          </code>
        </p>
      </td>

      <td>
        <p>
          Indicates that the video just reached the 75% quartile, and the video is displayed 100% in the viewport.
        </p>
      </td>
    </tr>

    <tr>
      <td>
        <p>
          OMID (

          <code>
            VerificationParameters
          </code>

          )
        </p>
      </td>

      <td>
        <p>
          <code>
            complete
          </code>
        </p>
      </td>

      <td>
        <p>
          Indicates that the video just completed, and the video is displayed 100% in the viewport.
        </p>
      </td>
    </tr>

    <tr>
      <td>
        <p>
          OMID (

          <code>
            VerificationParameters
          </code>

          )
        </p>
      </td>

      <td>
        <p>
          <code>
            twoSecondsFiftyPercentView
          </code>
        </p>
      </td>

      <td>
        <p>
          Indicates that the video was playing for 2 consecutive seconds, and the video is at least displayed 50% in the viewport. Note that, buffering the video or pausing, will reset the 2 seconds counter.
        </p>
      </td>
    </tr>

    <tr>
      <td>
        <p>
          VAST XML - OMID
        </p>
      </td>

      <td>
        <p>
          <code>
            \<Tracking event="verificationNotExecuted">
          </code>
        </p>
      </td>

      <td>
        <p>
          Indicates that the verification script failed to initialize.
        </p>
      </td>
    </tr>
  </tbody>
</table>

<Info>
  The 100% in the viewport display is an industry standard to track playback events such as quartiles. The two consecutive seconds and 50% display in the viewport is an MRC standard.
</Info>

***

### 1. Load the OMID service script

The provided IAB OM SDK is composed of a script (`omweb-v1.js`) and a mobile library that need to be included for the creative to support viewability.

<Note>
  **The script can either be self-hosted or pulled from Criteo’s CDN, where we host copies. The file can be found [on this page](https://static.criteo.net/banners/android/1.5.2/omsdk-v1_1.5.2.js).**

  `omweb-v1.js` is the OMID JS library for the web context.
</Note>

***

### 2. Create an ad session configuration and the ad session itself

Before the ad session initialization, the OM SDK needs to be activated. The ad session also requires specifying some parameters related to the Criteo integration.

<Info>
  OMID `VerificationScript` , `VerificationParameters` and `VendorKey` are provided inside the VAST.
</Info>

```swift expandable theme={null}
private static func createAdSession(adView: UIView?, vendorKey:String, verificationScriptURL: String, verificationParameters: String) -> OMIDCriteoAdSession {
    // ensure OMID has been already activated
    guard OMIDCriteoSDK.shared.isActive else {
        fatalError("OMID is not active")
    }

    // Obtain ad session context. See below
    let context = createAdSessionContext(withPartner: partner, adView: adView, vendorKey: vendorKey, verificationScriptURL: verificationScriptURL, verificationParameters: verificationParameters)

    // Obtain ad session configuration. See below
    let configuration = createAdSessionConfiguration()

    do {
        // Create ad session
        let session = try OMIDCriteoAdSession(configuration: configuration, adSessionContext: context)

        print("Session created")

        // Provide main ad view for measurement
        guard let adView = adView else {
            fatalError("Ad View is not initialized")
        }
        session.mainAdView = adView
        return session
    } catch {
        fatalError("Unable to instantiate ad session: \(error)")
    }

}
    
private static func createAdSessionContext(withPartner partner: OMIDCriteoPartner, adView: UIView?, vendorKey: String, verificationScriptURL: String, verificationParameters: String) -> OMIDCriteoAdSessionContext {
    do {  
        // Create verification resource using the values provided in the ad response
        guard let verificationResource = createVerificationScriptResource(vendorKey: vendorKey,
                                                                          verificationScriptURL: verificationScriptURL,
                                                                          parameters: verificationParameters)
        else {
            fatalError("Unable to instantiate session context: verification resource cannot be nil")
        }
    
    
        return try OMIDCriteoAdSessionContext(partner: partner,
                                        script: omidJSService,
                                        resources: [verificationResource],
                                        contentUrl: nil,
                                        customReferenceIdentifier: nil)
    
    } catch {
        fatalError("Unable to create ad session context: \(error)")
    }
}

private static func createAdSessionConfiguration() -> OMIDCriteoAdSessionConfiguration {
    do {
        return try OMIDCriteoAdSessionConfiguration(creativeType: .video,
                                                  impressionType: .beginToRender,
                                                  impressionOwner: .nativeOwner,
                                                  mediaEventsOwner: .nativeOwner,
                                                  isolateVerificationScripts: false)
    
    } catch {
        fatalError("Unable to create ad session configuration: \(error)")
    }
}
```

***

### 3. Register the player showing the ad and start the ad session

When the ad session is started, the Criteo verification script is automatically loaded. At this point, the Criteo verification script will start observing any `AdEvents` & `MediaEvents` that are triggered toward the OM SDK.

```swift theme={null}
func startSession() {
    print("Starting session for \(adSession.debugDescription)")

    createAdEventsPublisher()
    createMediaEventsPublisher()

    adSession.start()
}

private func createAdEventsPublisher() {
    // Create event publisher before starting the session
    do {
        self.adEvents = try OMIDCriteoAdEvents(adSession: adSession)
    } catch {
        fatalError("Unable to instantiate OMIDAdEvents: \(error)")
    }
}

private func createMediaEventsPublisher() {
    do {
        self.mediaEvents = try OMIDCriteoMediaEvents(adSession: adSession)
    } catch {
        fatalError("Unable to instantiate OMIDMediaEvents: \(error)")
    }
}
```

***

### 4. Trigger `adEvents` & `mediaEvents` events to OM SDK when Video & Ad related events occur

<Note>
  **The complete list of available `AdEvents` & `MediaEvents `is accessible [on IAB’s Github.](https://github.com/InteractiveAdvertisingBureau/)**
</Note>

Through those calls, the Criteo verification script will be able to compute advanced viewability events:

* Criteo will be able to track quartile events (if the video is 100% part of the viewport)
* Advanced events are computed to track if 50% of the video is playing & displayed in the viewport during 2 consecutive seconds.

All calls to both `AdEvents` & `MediaEvents` must be triggered aside of the existing tracking beacons for quartile & display events. Additionally, the video buffering events must be triggered.

Triggering OMID events is similar to triggering VAST trackers, both will be described in the following section.

***

## Step 4: firing beacons during video playback

Once the creative is downloaded, we can start the OMID session and trigger the `loaded` event.

```swift theme={null}
func didFinishFetchingCreative() {
  sessionInteractor?.startSession()

  // Report VAST properties to OMID
  let VASTProperties = OMIDCriteoVASTProperties(autoPlay: true, position: .standalone)
  sessionInteractor?.fireAdLoaded(vastProperties: VASTProperties)

  // get the player ready and attach listeners
  createMediaPlayer(withAsset: getVideoAndCaptions()!)
  addQuartileTrackingToVideoPlayer()
  attachPauseButtonImage()
  presentAd()
}
```

Right after the ad is presented, we can fire the `impression` beacons from VAST and to OMID.

```swift theme={null}
func emitBeacon(type: Beacon) {        
  let task = URLSession.shared.dataTask(with: self.tracking![type.rawValue]!);
  task.resume()
}

func didPresentAd() {
   emitBeacon(type: .impression);
   sessionInteractor?.fireImpression()
 }
```

The `start`, `firstQuartile`, `midpoint`, `thirdQuartile` and `complete` beacons are managed in a function triggered by a polling thread. For each of their playback events, we send both VAST and OMID beacons.

```swift expandable theme={null}
func addQuartileTrackingToVideoPlayer() {
  guard let player = player else { return }
  player.addPeriodicTimeObserver(forInterval: CMTimeMakeWithSeconds(1, preferredTimescale: 10),
                                 queue: DispatchQueue.main) { [weak self] _ in
    guard let self = self else { return }
    self.recordQuartileChange()
  }
  currentQuartile = .tracking
}

func recordQuartileChange() {
  guard let quartile = currentQuartile,
  let currentItem = player?.currentItem
  else {
    return
  }

  let currentTime = currentItem.currentTime().seconds
  let duration = currentItem.duration.seconds
  guard duration > 0 else { return }

  let progress = currentTime / duration
  switch quartile {
    case .tracking:
    if (progress > 0) {
      emitBeacon(type: .start);

      sessionInteractor?.getMediaEventsPublisher().start(withDuration: CGFloat(duration),
                                                         mediaPlayerVolume: playerVolume())
      currentQuartile = .start
    }
    case .start:
    if (progress > 0.25) {
      emitBeacon(type: .firstQuartile);

      sessionInteractor?.getMediaEventsPublisher().firstQuartile()
      currentQuartile = .firstQuartile
    }
    case .firstQuartile:
    if (progress > 0.5) {
      emitBeacon(type: .midpoint);

      sessionInteractor?.getMediaEventsPublisher().midpoint()
      currentQuartile = .midpoint
    }
    case .midpoint:
    if (progress > 0.75) {
      emitBeacon(type: .thirdQuartile);

      sessionInteractor?.getMediaEventsPublisher().thirdQuartile()
      currentQuartile = .thirdQuartile
    }
    case .thirdQuartile:
    if (progress >= 1.0) {
      emitBeacon(type: .complete);

      sessionInteractor?.getMediaEventsPublisher().complete()
      currentQuartile = .complete
    }
    case .complete:
    break
  }
}
```

<Warning>
  To ensure **[accurate beacon tracking](/retailer-integration/docs/tracking-ad-related-activity)**, **playback beacons** (start and quartiles beacons) **should only be emitted once, during the first play of the video**, while the video is playing.

  However, **interaction beacons** (such as click, mute, unmute, pause, and resume) **must be emitted each time the corresponding user action occurs.**
</Warning>

We handle the **pause/resume** beacons by attaching an event listener to the button. If the player is currently playing, we pause and emit the OMID and VAST pause beacons. Otherwise, we emit the resume beacons. We also change the image of the button to represent a play and pause button.

```swift theme={null}
@IBAction func tappedPlayingControl() {
  changePlayingControls()
}

func changePlayingControls() {
  if let player = player, player.rate == 0 {
    play()
    attachPauseButtonImage()
    sessionInteractor?.getMediaEventsPublisher().resume()
    emitBeacon(type: .resume)
  } else {
    pause()
    attachPlayButtonImage()
    sessionInteractor?.getMediaEventsPublisher().pause()
    emitBeacon(type: .pause)
  }
}
```

We handle the **click** beacon by creating a `Tap Gesture Recognizer` in the Interface Builder which is linked to the `playerView` and triggers a `clickHandler` action in the Controller. In this function, we send the OMID and VAST `click` beacons and instruct the browser to open the URL from the VAST tag, *only if a redirection URL is provided*.

If the redirection URL is not provided, we pause/resume the video and trigger the corresponding tracking beacons:

```swift theme={null}
@IBAction func handleClick() {
  let clickThroughURL = self.tracking![Beacon.click.rawValue];

  if((clickThroughURL) != nil) {
    sessionInteractor?.getMediaEventsPublisher().adUserInteraction(withType: .click)
    emitBeacon(type: .click)

    UIApplication.shared.open(clickThroughURL!)
  } else {
    changePlayingControls();
  }
}
```

Finally, we handle the **mute/unmute** beacons similarly, by attaching a listener to the button.  It changes the state of the player, the image of the button, and triggers the VAST and OMID tracking beacons.

```swift theme={null}
@IBAction func toggleMute() {
  player.isMuted = !player.isMuted
  player.isMuted ? attachUnMuteButtonImage() : attachMuteButtonImage();

  sessionInteractor?.getMediaEventsPublisher().volumeChange(to: playerVolume())
  emitBeacon(type: player.isMuted ? .mute : .unmute);
}
```

<Info>
  **OMID & buttons**

  As the OM SDK has access to the video player `UIView`, it checks and sends the percentage of the video being visible. So, if the buttons are on the overlay of the player, make sure to declare them:

  ```swift theme={null}
   adSession.addFriendlyObstruction(element, // muteButton, playButton
                                    purpose: .mediaControls,
                                    detailedReason: "Media Controls over video");
  ```
</Info>

***

## Step 5: finishing the ad session

It is important to handle correctly the destruction of the player and the ad session:

```swift theme={null}
func willDismissAd() {
    // Finish measurement
    print("Ending measurement session now")
    sessionInteractor?.stopSession()
}

func didDismissAd() {
    // Destroy the ad
    destroyAd()
}

/**
  Releases any resources that the ad may still be using after dismissal.
  */
func destroyAd() {
    hidePlayerControls()

    guard let videoPlayerLayer = playerLayer else { return }
    videoPlayerLayer.player = nil
    videoPlayerLayer.removeFromSuperlayer()
    try? FileManager.default.removeItem(at: localAssetURL)
}
```

***

## Extra: Handling closed captions (CC)

Instead of creating a `AVAsset` using only the video URL, we are creating a `AVMutableComposition` with 3 tracks:

* one for the video,
* a second one for the audio,
* and a third one for the captions.

Here is the full code example:

```swift coffeescript Swift expandable theme={null}
func getVideoAndCaptions() -> AVMutableComposition? {
  let videoAndCaptions = AVMutableComposition()
  let videoTrack = videoAndCaptions.addMutableTrack(withMediaType:.video , preferredTrackID: kCMPersistentTrackID_Invalid)

  let localVideoAsset = AVURLAsset(url: localAssetURL)
  do {

    guard localVideoAsset.tracks.count > 0 else
    {
      // error msg
      return nil;
    }
    try? videoTrack?.insertTimeRange(CMTimeRangeMake(start: CMTime.zero, duration: localVideoAsset.duration),
                                     of: localVideoAsset.tracks(withMediaType: .video)[0],
      at: CMTime.zero)
  }

  let audioTrack = videoAndCaptions.addMutableTrack(withMediaType:.audio , preferredTrackID: kCMPersistentTrackID_Invalid)
  do {

    guard localVideoAsset.tracks.count > 0 else
    {
      // error msg
      return nil;
    }
    try? audioTrack?.insertTimeRange(CMTimeRangeMake(start: CMTime.zero, duration: localVideoAsset.duration),
                                     of: localVideoAsset.tracks(withMediaType: .audio)[0],
      at: CMTime.zero)
  }

  let subtitleAsset = AVURLAsset(url: localCaptionsURL)
  let subtitleTrack = videoAndCaptions.addMutableTrack(withMediaType: .text, preferredTrackID: kCMPersistentTrackID_Invalid)
  do {
    guard subtitleAsset.tracks.count > 0 else{
      //error msg
      return nil;
    }
    try? subtitleTrack?.insertTimeRange(CMTimeRangeMake(start: CMTime.zero, duration: localVideoAsset.duration),
                                        of: subtitleAsset.tracks(withMediaType: .text)[0],
      at: CMTime.zero)
  }
  return videoAndCaptions;
}
```

<Info>
  **Note**

  Prior to iOS 15, `AVMutableComposition` only supports the insertion of locally stored assets; remote items cannot be used. As a result, we download and store the media file and closed captions locally before initializing the player.
</Info>

```swift coffeescript Swift theme={null}
public func fetch(_ remoteURL: URL, 
                  _ localAssetURL: URL,
                  _ statusHandler: @escaping (_ message: String) -> (), 
  								_ completionHandler: @escaping (_ fileURL: URL) -> (), 
									_ errorHandler: @escaping (_ message: String) -> ()) {
                    
  DispatchQueue.main.async {
    statusHandler("Fetching file...");
  }

  self.creativeDownloadTask = URLSession.shared.downloadTask(with: remoteURL) {
    (fileURL, response, error) in
      guard let fileURL = fileURL else {
        DispatchQueue.main.async {
          errorHandler("Unable to fetch file from remote URL: \(remoteURL)")
        }
        return
      }
    try? FileManager.default.moveItem(at: fileURL, to: localAssetURL)

    DispatchQueue.main.async {
      completionHandler(fileURL)
    }
  }

  self.creativeDownloadTask?.resume()
}
```
